# Mobile Printer Setup
#### *Fast-Weigh Mobile App*
*To add Mobile Ticketing or Dispatching to your Fast-Weigh subscription, contact us at 865-219-2980 or* [*support@tacinsight.com*](mailto:mailto:support@tacinsight.com)
The Fast Weigh Mobile app has multiple functions that can be used to streamline and optimize operations in the field. We offer both Mobile [Ticketing](https://tacinsight.zohodesk.com/portal/en/kb/articles/87-mobile-ticketing) and [Dispatching](https://tacinsight.zohodesk.com/portal/en/kb/articles/88-haul-mode) for any iOS or Android mobile device. If you are printing tickets in the field with the Fast-Weigh Mobile Ticketing App, there are a few different printers you can use depending on your mobile's operating system.
***
## Mobile Printing on an Android Device
Android devices support a wider variety of printers than Apple devices, but there are a few that we specifically recommend for mobile printing. If you do opt for a printer that is not in this list, you will need to follow the manufacturer's instructions to connect the printer to the Android device itself before printing in the Fast-Weigh app (Note: This usually requires downloading the manufacturer's printer utility from the Google Play Store first).
We recommend the [Star Micronics SM-L300](https://www.starmicronics.com/pages/sm-l300-apple-certified-portable-bluetooth-printer-receipt-label-sticky-paper) and the [Zebra ZQ520](https://www.zebra.com/us/en/products/printers/mobile/zq500.html).
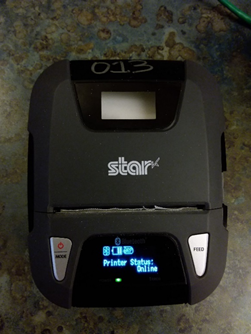
### Configuring a Star Micronics SM-L300 over Bluetooth
There are a few steps you will need to take to setup your printer before ticketing.
*Here is a link to the printer documentation from Star if you have any questions about the printer itself:* [*Star Micronics SM-L300 Manual*](https://www.starmicronics.com/Support/Mannualfolder/sm-l300_hm_en.pdf)
1. Turn on the printer by holding the power button until it powers on (There should be an audio cue).
2. * Ensure that Bluetooth is turned on in the printer settings (This should be the default).
* Ensure that Printer Status is online on the printer screen
* Ensure that the printer is adequately charged, as indicated by the battery icon above printer status on the screen.\
\
3. On your Android Device, go to Settings > Connections > Bluetooth.
4.
```
* _Note: This may vary depending on your Device._
```
```
* Ensure that Bluetooth is turned on.
```
5\. On the Bluetooth page, find and select your printer’s name.
* It will look something along the lines of "STAR L300".
6. Enter the password, if prompted, to pair.
1. The default Bluetooth password is 1234.
7. Once paired, the printer will show up under "Paired Devices".
8. Next, navigate to your Fast Weigh Mobile app.
9. Make sure that you have printing enabled in the app settings for [Mobile Ticketing](https://tacinsight.zohodesk.com/portal/en/kb/articles/110-mobile-ticketing-setup) or [Mobile Dispatching](https://tacinsight.zohodesk.com/portal/en/kb/articles/89-mobile-dispatching-setup).
10. Turn on Advanced Printing in the app settings.
11. Select Printer Type, then tap "Star Micronics" in the list of options that appears.
12. Press the blue box directly underneath Printer Type and look for your printer under Devices.
* *Note: It should look something like BT:STAR L300 34:81:F4:2D:93:90*
13. Tap your printer so that it is highlighted orange, then press the save icon in the top right.
14. *OPTIONAL:* Turn on Print PDF if you would like to print digital signatures, adjust your printer DPI, printer width, or Number of copies to print.
15. Go through the steps to create your Ticket through [Mobile Ticketing](https://tacinsight.zohodesk.com/portal/en/kb/articles/87-mobile-ticketing) or [Mobile Dispatching](https://tacinsight.zohodesk.com/portal/en/kb/articles/88-haul-mode).
16. Once you finish and tap "Create Load Ticket," the Ticket will automatically print.
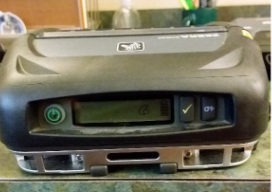
### Configuring a Zebra ZQ520 over Bluetooth
There are a few steps you will need to take to set up your printer before ticketing.
Here is a link to the documentation from Zebra about the printer if you have any questions about the printer itself: [*ZQ520 Mobile Printer Support*](https://www.zebra.com/us/en/support-downloads/printers/mobile/zq520.html)
1. Download the "Zebra Setup Utilities Printer Setup Utilities Support" from the [Mobile Printer Support page](https://www.zebra.com/us/en/support-downloads/printers/mobile/zq520.html) on your PC.
* Follow the on-screen instructions for connecting your printer to the Setup Utility via USB.
2. Configure the printer for Bluetooth connections following these steps: [Configure Bluetooth Through the Setup Utility](https://supportcommunity.zebra.com/s/article/Bluetooth-Setup-using-the-Zebra-Setup-Utility?language=en_US)
* The printer should restart after the last step of sending the settings to the printer.
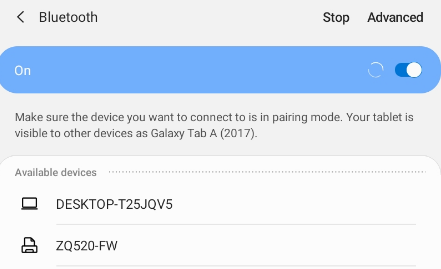
3. On your Android Device, go to Settings > Connections > Bluetooth.
4. * Note: This may vary depending on your Device.
* Ensure that Bluetooth is turned on.
5. On the Bluetooth page, find and select your printer’s name.
* It will look something like"ZQ520".
6. Tap the printer name under "Available Devices" to begin pairing.
* Press "OK" when prompted on the Android Device.
* Next, press the checkbox button on the printer itself to accept the Bluetooth pairing request.\
7. Once paired, the printer will show up under "Paired Devices".
8. Next, navigate to your Fast Weigh Mobile app.
9. Make sure that you have printing enabled in the app settings for [Mobile Ticketing](https://tacinsight.zohodesk.com/portal/en/kb/articles/110-mobile-ticketing-setup) or [Mobile Dispatching](https://tacinsight.zohodesk.com/portal/en/kb/articles/89-mobile-dispatching-setup).
10. Turn on Advanced Printing in the app settings.
11. Select Printer Type, then tap "Zebra" in the list of options that appears.
12. Press the blue box directly underneath Printer Type and look for your printer under Devices.
* Note: It should look something like ZQ520-FW CC:78:AB:3378:56
13. Tap your printer so that it is highlighted orange, then press the save icon in the top right.
14. OPTIONAL: Turn on Print PDF if you would like to print digital signatures, adjust your printer DPI, printer width, or Number of copies to print.
15. Go through the steps to create your Ticket through [Mobile Ticketing](https://tacinsight.zohodesk.com/portal/en/kb/articles/87-mobile-ticketing) or [Mobile Dispatching](https://tacinsight.zohodesk.com/portal/en/kb/articles/88-haul-mode).
16. Once you finish and tap "Create Load Ticket," and the Ticket will automatically print.
***
## *Mobile Printing on an Apple Device*
*iPhones currently only support printing through "AirPrint," which allows printing without additional software of drivers needed for your mobile device. AirPrint uses a Wi-Fi connection either by printing over your Wi-Fi network or with a "Wi-Fi Direct" connection to your device.*
*We recommend the* [*Brother RJ-3050AI*](https://www.brother-usa.com/products/rj3050ai)\
\&#xNAN;*For a list of AirPrint compatible printers, check here:* [*Apple - AirPrint Supported Printers*](https://support.apple.com/en-us/HT201311)
[*Additional information from Apple about using AirPrint*](https://support.apple.com/en-us/HT201387)
### *Configuring a Brother RJ-3050AI with Wi-Fi Direct (Recommended)*
*There are a few steps you will need to take before ticketing to setup your printer.* \
\&#xNAN;*Here is a link to the documentation from Brother about the printer if you have any questions about the printer itself:* [*Brother RJ-3050AI Manuals*](https://support.brother.com/g/b/manualtop.aspx?c=us\&lang=en\&prod=rj3050aieus&)
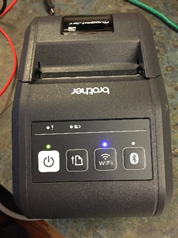
*Plug the printer into a power source with the provided power cable. Hold the power button on the printer until the light above glows green. Once the printer powers on, the light above the Wi-Fi button should be blue. If it is not, then hold the Wi-Fi button down until the light above glows blue.*\
\
\&#xNAN;*On your Apple device, go into the Settings App > Wi-Fi. Ensure that Wi-Fi is turned on.*
\
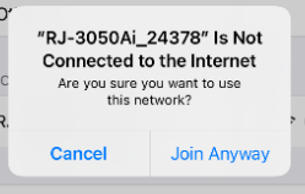
\&#xNAN;*Scroll down to DEVICES, and select your printer.It will be called something along the lines of RJ-3050Ai\_24378Note: After the first successful connection, the printer will be located under MY NETWORKS.*
\
\&#xNAN;*You may get a pop-up letting you know that the Printer is not connected to the internet. That is okay, select Join Anyway.*
\
\&#xNAN;*The printer is now connected! Note: Make sure not to disconnect from the printer "Wi-Fi" connection.*
*Next, navigate to your Fast Weigh Mobile app.*
*Make sure that you have printing enabled in the app settings for* [*Mobile Ticketing*](https://tacinsight.zohodesk.com/portal/en/kb/articles/110-mobile-ticketing-setup) *or* [*Mobile Dispatching*](https://tacinsight.zohodesk.com/portal/en/kb/articles/89-mobile-dispatching-setup)*.*
*Go through the steps to create your Ticket through* [*Mobile Ticketing*](https://tacinsight.zohodesk.com/portal/en/kb/articles/87-mobile-ticketing) *or* [*Mobile Dispatching*](https://tacinsight.zohodesk.com/portal/en/kb/articles/88-haul-mode)*.*
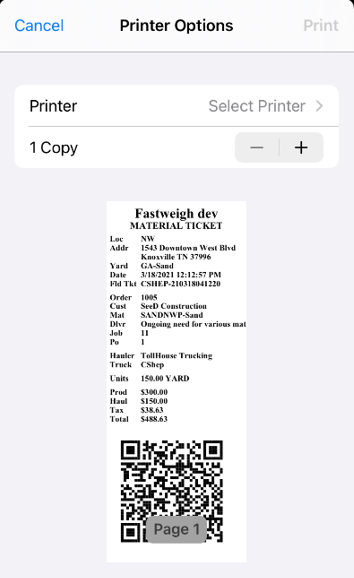
*Once you finish and tap "Create Load Ticket," you will be directed to the printing screen.*
\
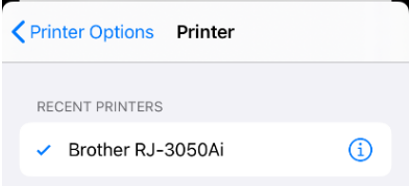
\&#xNAN;*Select the Brother Printer by tapping "Select Printer" and choosing it from the list.*
*Note: If the printer does not show up, go back into your Settings app > Wi-Fi and ensure that your device is still connected to the printer network.*
\
\&#xNAN;*If the printer is connected and you are still not seeing it as an option, try turning off your Wi-Fi entirely and then turning it back on (make sure the printer is re-connected).*
\
\&#xNAN;*Adjust the number of copies of the ticket to print, and then tap "Print" on the top right of the screen.*
*If you are having trouble connecting to your new printer, contact us at 865-219-2980 or* [*support@tacinsight.com*](mailto:support@tacinsight.com.) *and we can help out!*
---
# Agent Instructions: Querying This Documentation
If you need additional information that is not directly available in this page, you can query the documentation dynamically by asking a question.
Perform an HTTP GET request on the current page URL with the `ask` query parameter:
```
GET https://help.tacinsight.com/fast-weigh-knowledge-base/references/mobile-app/setup/mobile-printer-setup.md?ask=
```
The question should be specific, self-contained, and written in natural language.
The response will contain a direct answer to the question and relevant excerpts and sources from the documentation.
Use this mechanism when the answer is not explicitly present in the current page, you need clarification or additional context, or you want to retrieve related documentation sections.