> For the complete documentation index, see [llms.txt](https://help.tacinsight.com/fast-weigh-knowledge-base/llms.txt). Markdown versions of documentation pages are available by appending `.md` to page URLs; this page is available as [Markdown](https://help.tacinsight.com/fast-weigh-knowledge-base/references/web-portal/billing-ar/billing.md).
# Billing
***
Fast-Weigh features a flexible billing system that integrates with third-party accounting systems. This section allows you to organize groups of tickets into batches for invoicing a customer. Once a batch is defined, the system will automatically generate invoice numbers and group tickets into invoices.\
\
You can change your settings for how invoices are created in the [Portal Settings](/fast-weigh-knowledge-base/references/web-portal/account-and-administration/portal-settings.md).
***
## New Billing
Under the *New Billing* tab, users can query tickets by a number of different search parameters and produce filtered groups of tickets to assign to a custom batch. Typically, this would be done on a daily or weekly basis to correspond with your organization’s customer billing cycle.
Click the image to expand
Navigate to the Billing menu, and then the New Billing tab.
### Query Tickets for New Billing
* Set the parameters at the top to view the tickets you wish to group into a *Batch* to be billed.
* The grid below will populate with tickets that can be batched.
* You can also group tickets together in the grid based on one or more columns by dragging the column header to the bar above it.
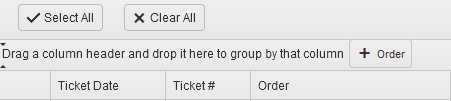
* Use the checkboxes on the left of the grid to select which tickets you wish to add to a *Batch*.
* *Verify the data* and make any changes as needed. The *Edit,* *Pricing,* and *PO Adjustment* buttons allow you to update Pricing or Tax Codes, edit the ticket directly, or adjust the PO Number associated with the ticket.
Click the image to expand.
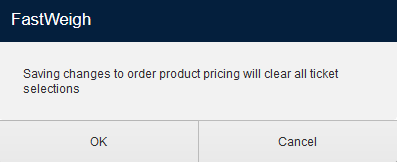
{% hint style="info" %}
*Note: Be aware that changing or editing tickets or their prices will clear all ticket selections.*
{% endhint %}
### Batching Tickets
* Once the Tickets in the *New Billing* query have been verified, assign them a *Batch Number* via the field at the top right of the table.
* This field is limited to 10 characters. Generally, this *Batch Number* will be in a date or Region + date format.
* *For example:* A batch created for a region named “West” on 10/15/2016 could be batched as W-101516.
* Assign a *Company Code* to the Batch, if needed.
* Set the *Invoice* and *GL Date* for the Batch, if needed.
* The *GL (General Ledger) Date* is only needed if your accounting system supports secondary Invoicing dates.
* Invoice Numbers are assigned *automatically and sequentially* to each Order or Customer (based on your billing settings) within the Batch.
* Click *Assign* to create the Invoice Batch.
{% hint style="info" %}
*Note: Invoices will always be broken out and grouped together based on the Invoice Break setting in your* [*Portal Settings*](/fast-weigh-knowledge-base/references/web-portal/account-and-administration/portal-settings.md)*.*
{% endhint %}
## Billing History
Once a Batch has been created, the Tickets will be moved from the *New Billing* page to their appropriate Batch in the *Billing History* section.
On the *Billing History* screen, use the parameters on the top to view individual Batches or view Batches from a specific date range, then Export them or send them directly to a customer.
{% hint style="info" %}
*Fastweigh supports direct transmission of invoices to both Viewpoint, Spectrum Accounts Receivable/Job Requisition and QuickBooks Online without needing to import any files or third-party tools.*
{% endhint %}

* Export: This method allows you to post invoices directly to your accounting system, based on your settings.
* Clear: Use this to clear a Batch so that you can make changes and re-Batch under the *New Billing* tab.
* Print: Allows you to print from a PDF copy of the selected Invoice Batch.
* Email: You can email invoices directly to customers.
* Before using this feature, you will need to go to Resources > Customers and [edit the Customer](/fast-weigh-knowledge-base/how-to-guides/how-to-create-new-records/creating-a-new-customer.md) to add their Invoice Email to their Customer profile if one is not already present.
You may also *export,* *clear*, *print*, or *email* individual Invoices within a Batch by clicking the arrow on the left of the table next to the *Region* column.
Click the image to expand.
Contained in this menu is the **\[Action]** button, which will allow you to clear the invoice or to issue a Credit/Rebill, which credits invoice, creates credit memo, and creates new tickets for rebilling. This process can be reviewed in the next section.
### Credit/Rebill
A Credit/Rebill action credits the invoice, creates credit memo, and creates new tickets for rebilling. This process should be used when attempting to edit tickets that have been created from orders with a **Cash Pay Type** since these types of transactions are understood by Fast-Weigh as immediate transactions.
To issue a Credit/Rebill:
* Navigate to the "Billing History" tab
* New drop down menu labeled "Batch Type"
* View invoices, credits, or both
* Expand the invoice to see the "Actions" button
Click the image to expand.
* When an invoice is credited, it will attach "-CR" to the end of the batch number.
* This can be customized
* Back date the invoice date if needed
* Hit "Credit/Rebill," select "I understand and wish to proceed," and hit "OK"
When you hit print on the invoice, you can see that the total is now negative
### How Does Credit/Rebill Affect the Ticket
* If you query your ticket number, it will only show the current version of the ticket. (Which can be rebilled again).
* You can change your view by selecting it in the new "Type" dropdown menu.
After selecting "All" you will see each version of the tickets.
After a ticket has been credited and rebilled, you will notice the "Type" column updated to reflect the action taken on the ticket. This is also reflected in the "Material Amount" column, where the material amount is changed between a negative and positive value.
In order to credit a ticket without rebilling it, all you have to do is void the current version of the ticket be editing the ticket in the ticket query.
* Click the \[Edit] button.
* Click the "Void" checkbox and fill in each Note field.
* Click **\[Save]**
***