> For the complete documentation index, see [llms.txt](https://help.tacinsight.com/fast-weigh-knowledge-base/llms.txt). Markdown versions of documentation pages are available by appending `.md` to page URLs; this page is available as [Markdown](https://help.tacinsight.com/fast-weigh-knowledge-base/references/mobile-app/setup/mobile-dispatching-app.md).
# Mobile Dispatching App
## Mobile Dispatching Setup
### Logging In
When you open the app for the first time, you will be prompted to select Ticket mode, POD mode, or Haul mode. For Dispatching, select Haul mode.
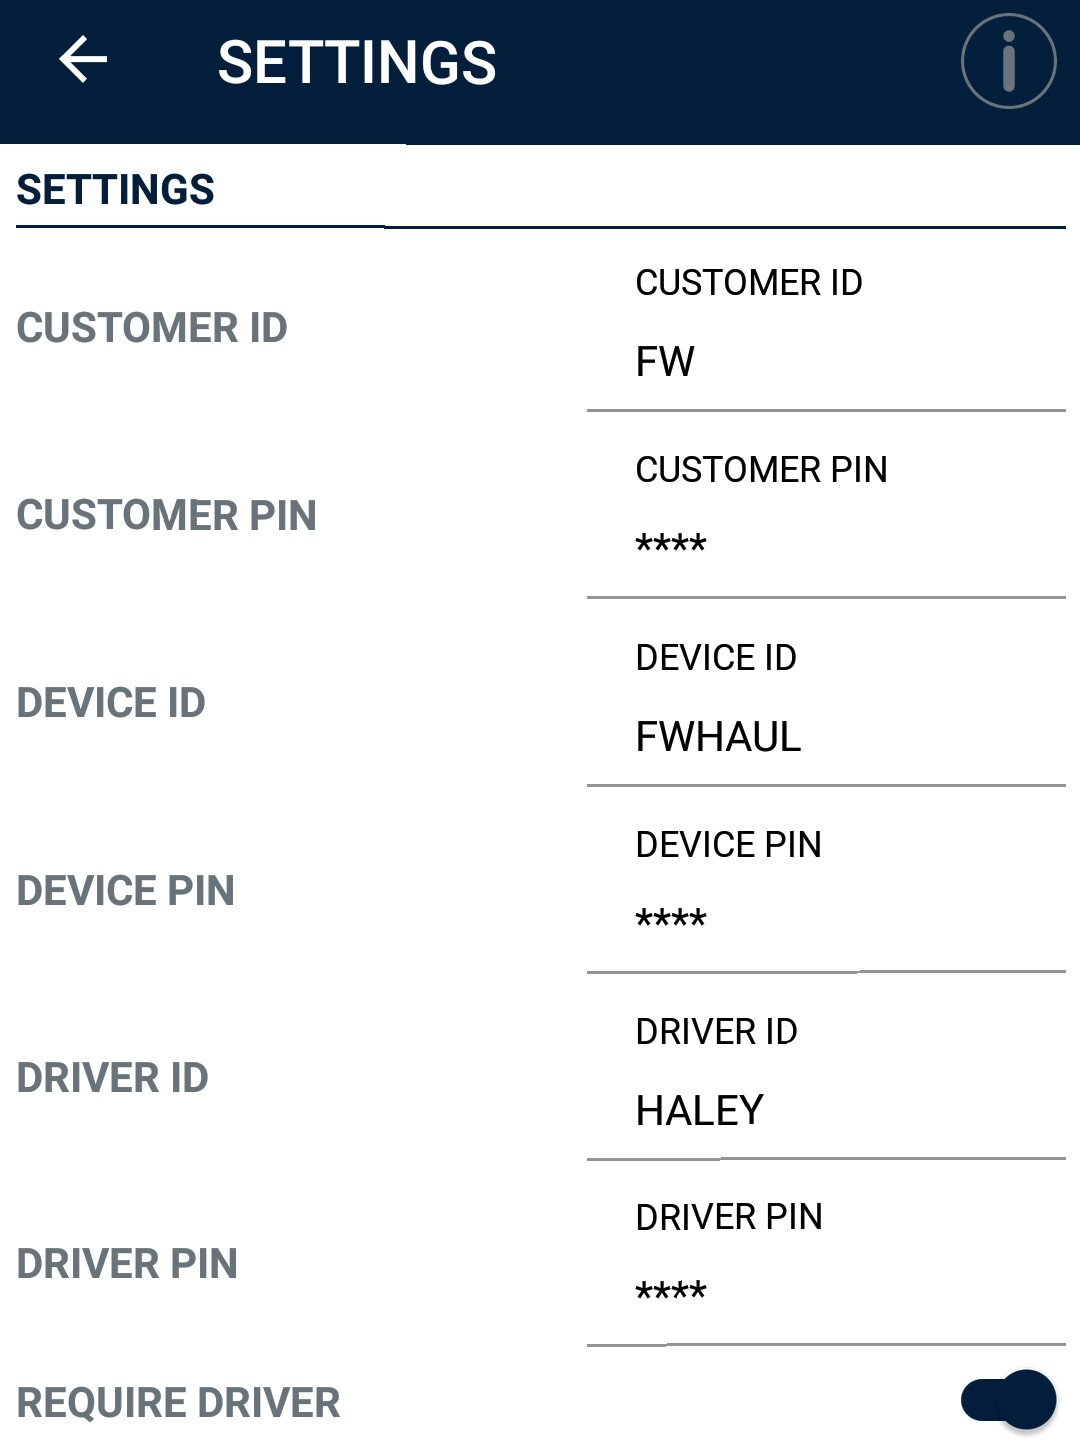
Customer ID and Customer PIN - To get your Customer ID and PIN, contact us at or call 865-219-2980 during business hours.
Device ID and PIN - These can be found on the Web Portal by going to Devices > Truck.
Driver ID and Pin - These are set up under Dispatching > Drivers and you must turn on Require Driver to set up a Driver.
Operator Name - The name of the driver operating the app if you have *Require Driver turned off*
### Settings
Click on the back arrow to go to the main Dispatching screen.
Sync the app to ensure all of your Settings have been entered correctly.
Click on the settings button at the top right to finish configuring the app.
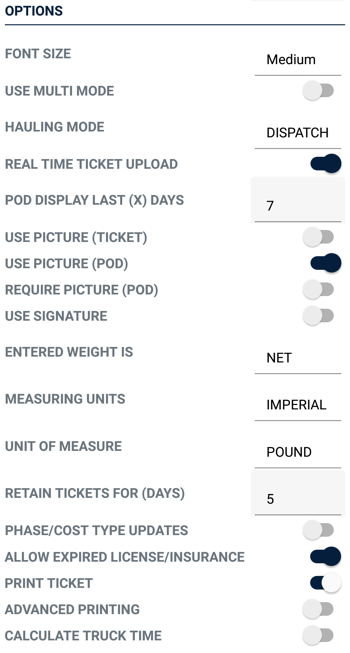
* Font Size - You can set a smaller or larger font size for the app here.
* Use Multi-Mode - Allows the user to switch between the Ticket, POD, and Dispatching modes.
* Hauling Mode - Set to Dispatching for the standard Hauling mode or POD to quickly switch to Proof of Delivery mode.
* *Some dispatching ticket types have the option to require Proof of Delivery.*
* *Hauling Mode POD will only show dispatching tickets with the same Truck Device ID that require Proof of Delivery, not the entire POD list.*
* Real-Time Ticket Upload - Enable to upload all new Fast-Weigh tickets to the Web Portal as they are created/received.
* POD Display Last (X) Days - Determines how far back the system looks for tickets that can be marked as delivered with POD.
* Use Picture (Ticket) - Enable to allow image capture when creating or receiving a ticket.
* Use Picture (POD) - Enable to allow image capture when creating a Proof of Delivery.
* Use Signature - Turn on to use a digital signature when creating or receiving a ticket.
* Entered Weight Is - Choose between a Net weight or Gross weight.
* Measuring Units - Set your preferred type of measure.
* Unit of Measure - Set the unit used.
* Retain Ticket for (Days) - Choose how long the system locally saves ticket data.
* *We recommend not exceeding 7 days since more data can impact the speed of the system by using excess memory.*
* Phase/Cost Type Update - Adds Phase and Cost Type fields to the ticketing screen.
* Allow Expired License/Insurance - Turn off to prevent ticketing if a truck's License or Insurance is expired and needs to be updated.
* Print Ticket - (must be on to print) Turn on if you are using a mobile printer.
* *Note: Mobile printing is not yet supported by Apple, so this setting will only be available for Android.*
* Advanced Printing - Turn this on to configure your mobile printer to automatically print a ticket.
* Printer Type - Set the brand of printer you are using: *Zebra, Star Micronics, or Rongta.*
* Search for Bluetooth Printer - Use the blue button to search for your Bluetooth printer and save it in the app settings.
* Print PDF - Turn this on to configure the size of the printed ticket.
* Printer DPI - Set the dots-per-inch for the printer.
* Print Width - Set the width of the printing area.
* *Note: Click on the "i" icon to see suggested defaults by printer type.*
* Number of Copies - This sets the default number of copies of the ticket to print.
## Assigning a Driver to a Device

Open the dispatching mobile app and tap the Settings button on the top right corner of the app.
You will see a Device ID and PIN, and a Driver ID and PIN at the top of the setting screen.
This is how your devices are assigned: the Device corresponds to the Truck and the Driver corresponds to the Driver.
*Ignore the Customer ID and PIN -- those should remain the same for your entire system. If you do not have a Customer ID and PIN set,* [*please contact support*](https://www.tacinsight.com/support) *for setup assistance.*
You need to first set up the Truck's Device ID and Pin before you can use mobile dispatching.
* On the Web Portal, go to the settings gear icon at the top right.
* Click Devices.
* *NOTE: You need an admin login to access this.*
* Go to the Truck tab on the Device Table.
* Add a new truck device ID/PIN by clicking + New Truck Device.
* The number of Truck Devices you can set up will be limited to the number of licenses you have on your subscription. If you would like to add a new license, [please contact us.](https://www.tacinsight.com/contact)
* Fill in the Device ID: This is custom, but we recommend using a system like the Truck ID.
* Fill in the Device Pin: This is custom, but we recommend using a system like the Truck number.
* Set the appropriate Region, Hauler, and Truck ID from the dropdown menus.
* Click Update.
You will need to establish Driver IDs and PINs for your drivers before you can assign them to a device.
* Go to the Web Portal and login.
* Go to Dispatching > Drivers
* Check to be sure the driver profile you want isn't already there. If you need to make one, click + New Driver.
* Choose the Hauler.
* Fill in the Driver ID: This is custom, but we recommend using a system like the Driver's last name.
* Fill in the Driver PIN: This is custom, but we recommend using a system like the Driver's Truck Number or the last 4 of their phone number.
* Click Update.
Once you have set up Device ID/Pin and Driver ID/Pin for all of your drivers, you can input these into the app settings to assign your devices to your Trucks and Drivers.
Fast-Weigh Mobile Dispatching *is an optional feature add-on. To add Mobile Dispatching to your Fast-Weigh subscription, contact us today at 865-219-2980 or*