Using Power BI and Telerik with Fast-Weigh GraphQL
Telerik Designing Reports Knowledge Base
Getting Started with Telerik Report Designer (Video)
Web Service Data Source Information
Excel Rendering Design Considerations
GraphQL can be connected into Power BI to visualize your data. In order to connect it up, you will need to be familiar enough with M Query to manipulate the Data Source Advanced Editor to connect in the API
Create a new Power BI File and click Get Data.
Select a Blank Query as your Data Source for now.
Leave this blank.
Add in a new parameter called x-api-key , set the Type to Text, and paste your API Key into the Current Value.
Add in PBI parameters for any variables in your GraphQL Query.
In this example, we have a To and From Date variable that we call RangeStart and RangeEnd in the PBI Parameters.
Your Queries should look something like this:
Navigate back to your blank Query .
Right-click the name in the Queries list and select advanced editor .
Copy and paste the pre-written query below into the Advanced Editor (overwriting what was already there).
It will automatically use your API key and the date parameters you set with a pre-written Get Ticket query.
When prompted to Specify How To Connect , click "Edit Credentials" and use Anonymous Access to connect.
When building your reports within Telerik, you have the ability to link your GraphQL Where Clause directly to dynamic parameters within Telerik to filter your data.
Ensure that you have your Where Clause set up within your GraphQL Query.
Tip: For more information about GraphQL Where Clauses, check out our article on Using Parameters in GraphQL.
When you copy your query Body over from Insomnia, it should auto-generate Telerik parameter connectors in your variables.
Make sure the Type is set to Inline for any Parameters that are passed to your GraphQL Body.
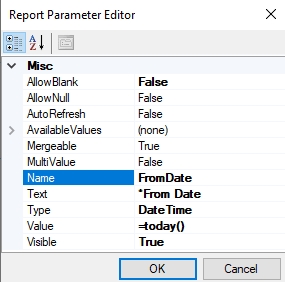
Setup the Telerik Parameter in the Report Parameter Editor pop-up
For more information about what the settings here are, check out this Telerik Report Parameters Docs
Click here for more info on the difference between Blank and Null.
Some GraphQL Where clause formats will need to add extra formatting in your Value
Integers: Make sure your body does not have quotes around the @variable in the Body.
Dates: Make sure your body does have quotes around the @variable in the Body.
You will also need to add the following formatting to the Value expression to ensure that the date is in the correct Year-Month-Day format:
= Format("{0:yyyy-MM-dd}", Parameters.NAME.Value )
String Arrays: Make sure your body does not have quotes and does have brackets around the @variable in the Body.
You will also need to add the following formatting to the Value expression to ensure that each value selected is wrapped in quotes and separated by commas:
='"' + Join('","', Parameters.NAME.Value ) + '"'
Integer Arrays: Make sure your body does not have quotes and does have brackets around the @variable in the Body.
Click Next to preview your data using the Design-Time Value, then click Finish.
In addition to Required Parameters that directly filter what is returned from your Data Source, you can also use Telerik by itself to create optional parameters and filters.
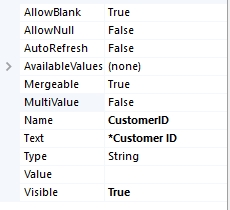
Add in a new Parameter in the Report Parameter Editor pop-up
For more information about what the settings here are, check out this Telerik Report Parameters Docs.
Click here for more info on the difference between Blank and Null.
Click OK to close the pop-up.
Add a new Filter that you will map to your new Report Parameter
Since we want this parameter to pull in everything when blank or filter to one customer when filled out, we will need to add in more to the expression than a simple filter.
Under the Expression side of the filter editor, click on the drop-down arrow and select <Expression>
Begin the conditional IIf statement with a check to see if the parameter is blank.
In the text box, click between the end of the Value and the parenthesis and add in an equal sign and an empty quote:
= ""
Click in the text box after the empty quotes and add a comma to begin the truePart of the IIf statement.
Note: Here, we want nothing to happen if the expression is true (the parameter is blank).
Add in another empty quote:
""
After the truePart, add another comma to begin the falsePart.
Navigate to Fields and double-click on the field you want to populate if the parameter is not blank (what it will be matching).
Note: Here, we want the Customer ID to populate if the expression is false (the parameter is not blank).
Click OK to close the Expression Editor.
Under the Value side of the filter editor, click on the drop-down arrow and select the Parameter.
Navigate to the Home tab on the top of the Report Designer and click Preview to test out the report.
You should be able to leave your new parameter blank (you may have to click inside of the field and then click out in the report designer so it registers and blank) or type in a value to filter the report to that single value
Sometimes, you may have a table linked in your GraphQL query that can be set or completely blank depending on the parent table it is connected to.
"An error has occurred while processing TextBox 'textBox2': The expression contains object 'Name' that is not defined in the current context."
If you do receive this error for the Salesperson Name field (or any other field), there is a workaround you can use to display the name when it is set or hide the object entirely when it is blank.
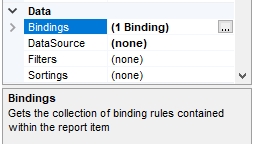
Find the Data section of the Properties.
Click on the "..." button to edit the Bindings.
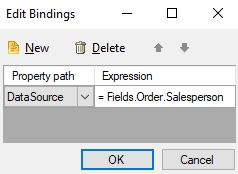
Add a new Binding.
Set the Property Path to "DataSource"
The Expression needs to be the parent of the field you are wanting to display. In this case, we want to see = Fields.Order.Salesperson.Name so we will set the Expression to
= Fields.Order.Salesperson
In the field where you want to show the salesperson name, you only need to add the second half of the expression we referenced for the DataSource = Fields.Order.Salesperson.Name.
If you do not want the field to be entirely blank, you can set a "NoDataMessage" and "NoDataStyle" in the Properties Panel
You may encounter some common abbreviations in the fields available to retrieve with GraphQL. Here is a repository of those abbreviations and what they mean so that you can replace them in your reports.
Tax Status
T = Taxed
X = Exempt
Credit Status
O = Open Account
C = Cash Only
N = Do Not Sell
Default Dispatch Type
PD - FastWeigh POD
CP - Create at Pickup
CD - Create at Delivery
RP - Receive at Pickup
RD - Receive at Delivery
LC - Load Count Only
Pay Type
C = Charge Hide
D = Credit Card
K = Check
S = Charge Show
X = Cash
Status
A = Active
I = Inactive
C = Closed
Freight Type, Surcharge Type, and Order Quantity Type
U = Per Unit
L = Per Load
Status
A = Active
I = Inactive
C = Closed
Pay Type
C = Charge Hide
D = Credit Card
K = Check
S = Charge Show
X = Cash
Status
B = Bidding
P = Pending
C = Accepted
R = Rejected
E = Expired
A = Awarded
Status
A = Active
I = Inactive
C = Closed
Ticket Type
PD - FastWeigh POD
CP - Create at Pickup
CD - Create at Delivery
RP - Receive at Pickup
RD - Receive at Delivery
LC - Load Count Only
Manual Weigh
0 or False = Weight from a scale
1 or True = Manually typed weight
Note: Make sure you are running Telerik Report Designer version 14.0.20.219 or later.
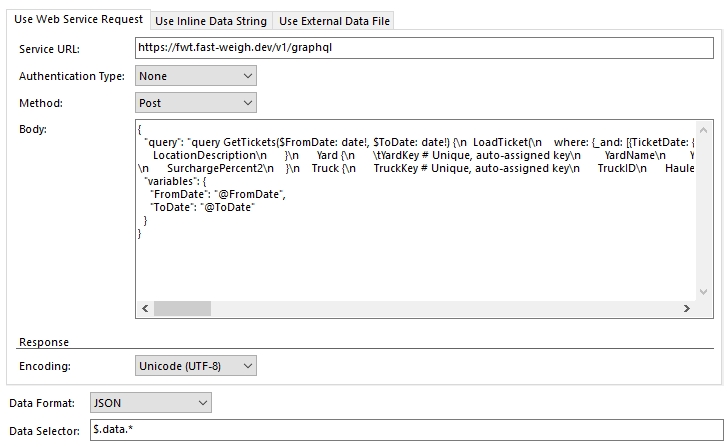
Enter in your GraphQL Endpoint URL into the Service URL. Example:
https://fwt.fast-weigh.dev/v1/graphql
Your URL can be found at portal.fast-weigh.com/APIInfo
Set the Method to Post
Enter the Body from the Insomnia plugin "Fast-Weigh: Copy Telerik Body"
Set the Data Selector to $.data.*
Create a new parameter called x-api-key.
Set the Type to Header
If you are using a WHERE clause in your Body, check out this article for information about setting up Inline parameters.
Note: In our example, our Inline Parameters are the @FromDate and @ToDate.
Fast-Weigh GraphQL
To add the API module to your Fast-Weigh subscription, contact us at 865-219-2980 or .
is a modern cloud-based truck ticketing, ordering, and dispatching platform.
The Fast-Weigh REST & GraphQL APIs allow system integrators to interface with the Fast-Weigh data model to extend functionality and/or extract data for third-party use.
The Fast-Weigh REST & GraphQL API services use token-based authentication with a custom x-api-key HTTP header record. The token should be included with every call.
Basic Authentication has been deprecated.
We have transitioned from using Basic Authentication with username/password credentials to token-based authentication. Existing integrations will continue to work, but please note that Basic Auth has been deprecated and will be removed in the future.
Your endpoint:
Don't see API Info on your web portal?
You may not be an admin of your Fast-Weigh account. Check with a known admin to see if they can set up this key.
Your company's account may not have this enabled. If this is the case you will need to contact your sales or onboarding rep to get it enabled.
API schema explorer:
Your credentials will allow you to use the Insomnia tool to build queries. There, you can dive into the data model docs as well as test queries with the live editor.
GraphQL queries are handled via standard HTTP.
The first thing to understand is the GraphQL query itself is sent along in the body of the request. Since HTTP GET calls cannot include a request body, every call sent to the GraphQL server must be a POST request.
The request body itself should be JSON encoded. So the query you write will be transformed into something like this:
These clients typically let you write your query in standard GraphQL syntax, and they handle the rest.
Also, thanks to GraphQL's build-in introspection, many libraries can generate a fully-typed API client for you to use!
Parameters allow you to pass data into your GraphQL statement.
Int
String
Boolean
date (yes, this one is lowercase)
It's important to note that dates must be formatted as YYYY-MM-DD when being passed as parameters.
Parameter arrays can be used for filters like the "_in" filter and are defined with []'s.
[String!]
[Int!]
If you are not familiar with GraphQL, no worries. It's easy to learn. If you have experience working with SQL you'll feel right at home. The syntax also looks similar to a JSON document if you are used to working with responses from REST endpoints. In fact, the structure of the query is simply the format of the JSON response you'd like to receive back.
Another nice feature of GraphQL is schema introspection. That's a fancy way of saying that the fields are self-documenting. This allows us to build things like the Insomnia GraphQL Schema that provides autocompletion and field documentation that is always up to date with the latest API changes. (🍻cheers to no documentation lag!)
With GraphQL, you're still issuing a request to an HTTP endpoint just like you would for a REST API. The big difference is there is a single endpoint that services all requests.
For Fast-Weigh, the endpoint looks like this:
If you calling the GraphQL endpoint directly, all requests must be POST requests with a JSON encoded query as the body of the request (Content-Type: application/json)
Here's a simple query that requests a few fields from the Customer GraphQL type:
Let's break that syntax into its parts:
ActionType: GraphQL endpoints support the following "ActionTypes". Note that Fast-Weigh only supports the "query" type at this time.
query: ✅ Similar to a SQL SELECT statement
subscription: ❌ A WebSocket based live data stream
mutation: ❌ Similar to a SQL UPDATE or INSERT statement
QueryName: This is the identifier for the query. You can give it any name you'd like. In the GET CUSTOMERS example the QueryName could have been "getAllCustomers", "get-customers-list", or anything else you could dream up. I went with "customers" for brevity.
Type: If you are familiar with SQL, you can think of this as the corresponding SQL table.
TypeField: Again, if you are familiar with SQL, you can think of this as the columns within the corresponding SQL table.
The response back from this query will be a JSON response matching the format requested.
If a requested field has no value, it will be omitted from the response. This compresses the payload size and increases performance.
Finding the available fields
Relationships in GraphQL can be of 2 types:
Object: 1 to 1
Array: 1 to many
Object relationships
Object relationships will embed a single subtype in the response.
For example, the Customer type has an Object Relationship with a TaxCode.
So a query like this:
Will result in a response that looks like this:
Array relationships
Array relationships will nest an list of objects in the response.
As an example, a Customer may have many Orders.
So the Customer type has an array relationship with orders. And querying for the Orders would look some like this:
And result in:
Until now, the queries we've written would have returned all results from the Customer table.
To filter the results, GraphQL supplies us with a few syntax options.
Limit & offset
This one is pretty easy. Within the Type your are querying, supply the limit argument with an integer specifying the number of results you'd like returned.
Note that this only limits the Customer type to 10 results. So the nested Orders array may contain many more. You can limit on the nested Orders type in the same way.
If you want to limit each response but still cycle through to retrieve all of the filtered data, you can use an offset loop to go through the next set of 10 records.
In practice, you'd want to increment this number on each call by whatever your limit is. So the first call would be offset of 0, second call an offset of 10, then 20, 30, and so on. Once you get a payload with fewer records than your limit, you'll know there are no more records to retrieve and can stop issuing queries.
Order by
Building on the query above, you can order the results by adding an "order_by" field to your arguments.
Notice you must pass an object to the "order_by" argument with the field you'd like to order, as well as the sort direction.
The following sort directions are permitted:
asc
asc_nulls_first
asc_nulls_last
desc
desc_nulls_first
desc_nulls_last
Where clauses
Let's modify the query once again and supply a "where" argument.
The "where" argument can apply a number of different filters to a given field.
_eq: equal to
_neq: not equal to
_gt: greater than
_gte: great than or equal to
_lt: less than
_lte: less than or equal to
_in: exists in an array of values
_nin: does not exist in an array of values
_like: matches some part of the given string
_nlike: does not match some part of the - given string
_is_null: ...is null 😆
Here's an example of querying for just Customers in the State of Tennessee:
And here's an example of passing an array of States to the filter using the "_in" clause:
Using multiple filters with _and / _or
You can use the _and / _or operators along with the other "where" filters to create more complex queries.
_and: Data must satisfy all of the included filters
_or: Data must satisfy at least one of the included filters
These operators open up an array using "[]" brackets that contain all the filters you wish to apply.
_and:
This query will return a Customer only if it is within the provided States, and also has a Country set to "US".
_or:
This query will return a Customer if it's within the given States, OR if its CustomerID field contains "100".
Filtering on nested Types
Remember that filters can also be used on nested Types as well. But there is a difference for "where" filters in Object vs Array relations.
Object relationship "where" filter
For Object relationships, you'll apply the filter on the parent. For example, a Customer can only have a single TaxCode. So to filter the Customers TaxCode you could write:
Array relationship "where" filter
For Array relationships, you'll typically apply the filter on the nested array itself. For example, a Customer can have many Orders. So to filter the Orders returned you would write:
Completely separate requests can also be merged within a single query. This is useful if you need to bring in data from multiple tables and only want to make a single HTTP call to do so.
Typically compound queries would only be used to stitch together the responses of smaller queries. You would not want to combine multiple large payload queries in the same request/response as this can be quite taxing to fetch and parse due to query complexity and payload size.
Here's an example request for some base resources within Fast-Weigh. These lists are generally quite short and are good candidates for compound queries if applicable to your use case.
Results in:
Putting queries into practice
Query Variables
GraphQL provides a live schema via introspection of the API endpoint. That's a nerdy way of saying the available fields are always up to date and you don't have to worry about the documentation being stale!
How to View the Schema
GraphQL queries are based on "Types". These types are similar to a SQL Table.
A "Customer" database table, for example, becomes a "Customer" type in GraphQL.
Root type:
First, you'll need to drill into a "root" type, two of which are available:
query_root
subscription_root
In the vast majority of cases, query_root is what you're after. It's equivalent to a SELECT query in SQL.
The subscription_root is useful for programmers wanting a live websocket connection to the data.
If you're following along, click into the query_root to continue.
Exploring a GraphQL type:
Inside the query_root you'll see a list of available Types to explore.
Let's click into the Customer type.
Here, you'll see a link to view the fields available on the Customer type at the top.
You'll also see a list of arguments that can be passed into the type to filter or order the results returned.
For example, the limit argument tells you that you can pass an integer to limit the number of results.
Clicking inside the actual Customer type at the top reveals the fields available to you within that type.
Object relationships on a type are 1:1 relationships with another type.
On the Customer type, if you scroll to the bottom, you'll see the TaxCode field. This is listed as an object type, meaning that if you query for the Customer's TaxCode the result will be a single TaxCode object.
Array relationships on a type are 1:N relationships with another type.
On the Customer type, you can find the Orders field. This is listed as an array type, meaning that querying for Orders will return a nested array of Orders for the Customer(s) you are filtering for.
With this M Query as the base, you can replace the GraphQL body with your own , just make sure to escape any quotes in the GraphQL with double quotes as instructed in the M Query comment. If you do replace the GraphQL, you will want to remove all of the steps after the Convert to Table step and re-create the expand column steps for your own query.
Repeat the data setup until you have all of your desired data sources added, and Close & Apply the Power Query Editor. You can use a flattened version of the Query like in the example, or you could repeat these steps for individually queried tables that you want to bring in, and then join the tables via their keys from the Relationships Model page.
Click Next to go to the Configure Request Parameters page. Here, you will see your auto-generated parameters.
Enter the values you want to use for the data preview in the Design-Time Value
Set up the parameterized value in Value by selecting the drop-down > New Report Parameter (if you have pre-setup your parameter, just select it from the list).
Strings: Make sure your body does have quotes around the @variable in the Body.
You will also need to add the following formatting to the Value expression to ensure that each value selected is separated by commas:
=Join(',', Parameters.NAME.Value )
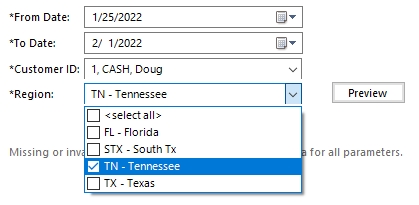
Navigate to the Home tab on the top of the report and click Preview to test your parameters.
Set up the parameter by right-clicking the white space on the report and then clicking Report Parameters...
Right-click the report white space again and this time select Filters... Note: you can also use Filters for simple data filters like filtering out all voided tickets.
Click in the text box after the equals sign
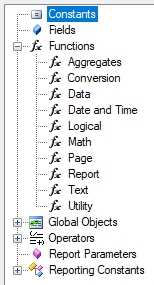
Navigate to Functions > Logical and double click IIf to add it into the text box above. (You can also manually type this instead of pulling it in from Functions)
Add in the parameter value by Navigating to Report Parameters > click the + by the parameter name > double click Value Note: Here, we are adding Parameters.CustomerID.Value
This completes the check to see if the parameter is blank.
This completes the truePart of the IIf statement.
This completes the falsePart of the IIf statement.
This completes your entire optional filter. Go ahead and close the Filter Editor.
A good example of this would be if you wanted to show the Order Salesperson Name, which might not always be set on the Order. When you query this in GraphQL, it can return in two ways:
While the way this data is returned may be fine in the JSON view, it can cause some major problems in Telerik. This is because you end up trying to call a field object that either exists and returns correctly or doesn't exist at all:
When you add the Salesperson Name field to the report like normally and then run the report, the Orders that do not have a salesperson will show you the following error in place of where the name would be:
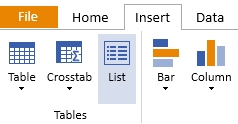
Navigate to the Insert tab at the top of the Report Designer.
Inset a List from the Tables section.
Select the new List object, and navigate to the Properties Panel on the bottom-right.
Click OK to save the Bindings
Click inside of the new List object, add in new text boxes for the field title and the field itself, and set up their formating
In this case, we only need to input = Fields.Name to get the Salesperson Name.
Lastly, make sure to preview the report for both fields that should have a Salesperson and should be blank to make sure everything functions as expected.
In my example, including the field title in the list ensured that it was hidden entirely when there was no salesperson set, but you can keep the title outside of the list to prevent this.
Navigate to the Data tab of the Report Designer
Select Web Service Data Source to bring up the configuration wizard
Click Next > to configure the Request Parameters
enter the API key in both the Value and Design-Time Value fields
Click Next > to show the Preview Your Data page Click on the Download button to run the PreviewClick Finish >>| to load in your dataset to use in your report.
You can find your endpoint listed on the page under the settings gear of the Fast-Weigh Web Portal.
The endpoint should look something like this:
Unless you are programming in a very obscure language, .
GraphQL introspection powers autocomplete within our .
This tool also allows you to browse the schema, as explained .
Once you've got the query basics down, it's time to start experimenting and using them for your own use case in Insomnia or start in your programming language of choice.
Download & install Insomnia Client:
Download & install the Insomnia Fast-Weigh Reporting Plugin:
Download the Telerik Reporting .exe (no install needed) and example reports:
Note: If this link is not working, please email
Head to the page and follow the instructions listed there to view the schema docs via the .
Check out the Graph behind the GraphQL here:
Arguments/filters are covered further in our .


