New User Log-ins must be created by your Web Portal Administrator. Due to security concerns, Fast-Weigh Support will not create or modify user Log-Ins.
After your user account has been created you will receive an email from [email protected] with the subject "Fast-Weigh Password Setup" This email contains your User ID and a link that allows you to set your password:
Note your User ID and click the Link
Click the link in the email to be taken to the "Set Password" page:
Create your password
Enter your desired password twice and Click "Set Password"
Default Password Requirements require a minimum of 6 Characters. However, your Web Portal Admin may have increased these requirements. Please reference the blue text underneath the "Set Password" button for any additional requirements.
Click on the link in the success message to be redirected to the Fast-Weigh Web Portal
Click the Link to Log in for the first time
Enter the User ID from the account creation email and the password you set and Click "Log in"
Check out the next Tutorial to learn about Navigating the Web Portal
Fast-Weigh Knowledge Base
Get an overview of Fast-Weigh's features, integrations, and how to use them.
How To Guides are intended to quickly give the user step-by-step instructions for accomplishing a basic task. Be sure to check or References section if you need further clarification.
You can make changes to tickets if you notice an error.
If you are changing the weights ensure you change the Net Units as this field is not automatically calculated if making an edit.
If you need to make an edit to a ticket on a Cash order you will need to perform a Credit/Rebill before any changes take effect. If you do not perform a Credit/Rebill the information will change, but the dollar amounts will not change unless the Credit/Rebill is performed first.
This applies to an order with a pay type set to Cash, Credit Card, and Check.
There are 2 primary ways to Edit a ticket. It can be done one at a time via the "Ticket Query" or edits can be made in Bulk via the Ticket Bulk Edit.
Breakdown of the technical meaning of every field in Fast-Weigh. Broken out by menu tabs
In-Yard
The following will provide a basic outline of the information provided by the Load-Out module in your Fast-Weigh Application.
Tickets
The following will provide a basic outline of the information found within the Tickets tab in your Fast-Weigh Application.
Quotes
Orders
Inventory
Outline of information regarding the Inventory module and it's functions.
Trucks
Outline of information for the Trucks tab and it's functions.
Dispatching Ticket Types
Editing a Region
1
Navigate to [ Resources > Location ]
2
Click [ ✏️]
3
Make Changes
After clicking the Pencil Icon, you can then update any fields you want to change.
4
Click [ Update ]
After making your changes, click [ Update ] to apply the changes.
How to Set Up SSO Login
This page will walk you through how to set up your SSO login for Fast-Weigh
Navigate to portal.fast-weigh.com
Click on the SSO Login button
Enter your SSO name, which is your TenantID in Fast-Weigh, and your admin can provide you with this ID
Contact your admin to complete the SSO login process
Invoices
The Invoices page allows you to review your companies invoices within Fast-Weigh. If this page is not available to you, it may be that your merchant has opted not to display this page.
To search for your invoices, you will need to input the correct date range for the Tickets that are included on the invoice. Alternatively, you may enter a specific Invoice # to review a single invoice.
In the above image, there are two invoices available between the selected ticket dates. By clicking on the black arrow on the left side of each line, you can expand each invoice to review the associated ticket information. This contains most of the information that can be found within the Ticket Query.
Your merchant may already provide a physical or digital copy of your invoices, but you can also print a copy from this menu as well by clicking on the [Print] icon available with each invoice.
Questions or errors related to your billing should be referred directly to your merchant. Fast-Weigh Support is unable to assist with questions regarding how your merchant handles their billing process.
Classic
The [ Classic ] submenu allows users who prefer the older format of the Dashboard, In-Yard, and History pages to access them.
Projects
Here you are able to create projects for use with setting up a quote or multiple quotes. You can click + New Project to create a new project, and you set the Project Name, Project Description, Owner Name, and Start Date. The Status will default to Active but you can change this if need be.
Once you have created projects you will see them in the table and be able to Edit or Delete them. If you have many projects you can use the Search function to find a specific project.
Now you are able to add quotes to a project when creating a quote!
Dashboard
Detailed information regarding the Dashboard page of the Inventory Module
Here you can set Region, Location, and Through Date to see specific inventory data. There is a table with the relevant products on the left side of the screen, and the associated graph of the product inventory on the right side.
Table
Inventory Dashboard Table
The table will provide the Region, Location, Yard, Product, and Current Inventory. You may click any of the column headers to sort by ascending or descending.
Graph
This graph provides a visual representation of the current inventory of the filtered products. You can hover over the bars to get the numerical value, and you can filter down how much information is shown here by setting the Region, Location, and Through Date.
The Y-axis is Units and the X-axis is the products.
Truck Adjustments
Truck Adjustments allow you to add or deduct from a Hauler payment based on Types that you have created in the Setup menu.
These adjustments are applied by selecting Hauler Pay>Truck Adjustments and then clicking the [+New Adjustment] button. This will open a new window allowing you to select the desired parameters. If your organization has a hauler operating in more than one Region, you may have different Types created that will need to be associated between Regions depending on the order location.
Click the image to expand.
In the above example, our Hauler will be paid $3.00 per Gallon of fuel while operating the Belt Region.
Navigating the Web Portal
How to navigate to different modules, vocabulary for using our software
Navigation
When you first log into the Web Portal, you will see the Home Screen Dashboard:
Depending on your User Role, Restrictions, and currently subscribed modules, the Tabs visible at the top of your screen may vary.
Using the Ticket Query
Finding and Editing Tickets in Fast-Weigh
The Ticket Query is essentially a search engine for looking up tickets. To view the ticket query navigate to Tickets > Ticket Query.
The Parameters found at the top of the screen allow you to filter down ticket data
By default, the Ticket Query will load with today's date entered in the Date Fields.
Click the Query button to search for tickets:
Creating New Web Portal Users
You can create multiple logins to your Web Portal so that different parts of your organization can access the data they need.
How to Create Users
1
Creating Tax Codes
Define all tax codes used within your company’s various locations. Tax codes should correspond with those set up in your third-party accounting system.
How to Create Tax Codes
1
Creating a New Region
Fast-Weigh has a 3-tier operating location structure: Regions, Locations, and Yards. This allows flexibility for companies of all sizes to manage their production.
How to Create a New Region
1
Creating a New Location
Fast-Weigh has a 3-tier operating location structure: Regions, Locations, and Yards. This allows flexibility for companies of all sizes to manage their production.
How to Create a New Location
1
Creating a New Yard
Fast-Weigh has a 3-tier operating location structure: Regions, Locations, and Yards. This allows flexibility for companies of all sizes to manage their production.
1
Navigate to [ Resources > Locations ]
2
Creating a New Customer
You can manage your entire customer list from the Customers section of the Web Portal. This includes full contact information, payment terms, pricing level, and credit status.
How to Create Customers
1
Creating a New Pricing Template
Pricing Templates are what drive your default pricing when adding products to an Order. You can create as many of these as needed.
Creating a Pricing Template
1
Creating a New Truck
Before new Trucks can be added to your Fast-Weigh system, you must have one or more Haulers. In most cases, the Hauler is a carrier, trucking company, or customer who owns the truck.
How to Create Trucks
Navigate to "Trucks" > "Trucks"
Creating a New Hauler
How to Create Haulers
Navigate to "Trucks" > "Haulers"
Creating a New Driver
1
Navigate to [ Trucks > Drivers ]
2
Creating Invoices
Fast-Weigh features a flexible billing system that integrates with third-party accounting systems. This section allows you to organize groups of tickets into batches for invoicing a customer.
How to Create Invoices
Navigate to "Billing" > "Billing"
Creating Statements
Generating a Customer Statement
Navigate to "Billing" > "Balance Dashboard"
Creating Hauler Pay Statement
The Hauler Pay module allows you to organize groups of tickets into batches for invoicing a Hauler, much like the Billing module, based on Hauler Pay rates set for orders.
Hauler Pay Statements are generated from invoices.
Generate a Hauler Pay Statement
Navigate to "Hauler Pay" > "
Edit via Ticket Bulk Edit
1
Navigate to [ Tickets > Ticket Bulk Edit ]
2
Edit via Ticket Query
1
Navigate to [ Tickets > Ticket Query ]
2
How to Import Customers
1
Navigate to [ Resources > Customers ]
2
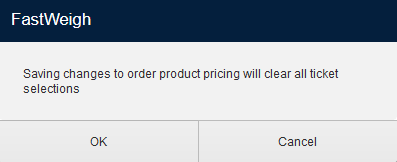
Changing Order Product Pricing
Order Products refer to the product that are on an Order.
Navigate to "Orders" > "Orders"
Select the order that has the product that will be changed
How to Send Invoice Emails
1
Navigate to [ Billing/AR > Billing ]
2
How to Clear Unsynced Records
Unsynced records in Fast-Weigh can be created from varying factors. It is important that these records are addressed to prevent billing errors. The explanation and steps in this article can help your users resolve some of these errors.
Unsyced records are most commonly caused by a mismatch of information between the Web Portal and the Ticketing App or an internet outage. To resolve these errors in the ticketing app, click on the red text displaying the unsynced record message.
The Unsynced Records page will show you records that may have errors along with Pending tickets that are not yet complete. The Type column will display the type of record affected. In the image above, this Pending ticket has an Unknown Error listed. On the far right of the screen are the Clear Error and Sync columns, which can be clicked for each individual record.'
Dashboard
Detailed information on the Dashboard tab of the Load-Out module
In the Load-Out Dashboard screen, you are presented with two graphs:
You are able to filter the information presented on the table by selecting a Region and a Location. Setting a filter will show any relevant trucks or loaders on their respective tables.
Minutes In Yard Graph
Dashboard
Here you are presented with three different graph views; Count, Amount, and Awarded by Salesperson. As well, there is a table view with two different tabs you can view; Salesperson and Customers.
The first chart, Count, presents a pie chart that breaks down what stage your quotes are in. The stages, Pending, Awarded, Bidding, Accepted, and Rejected/Expired will be broken into percentages on the chart, as well as having their numeric value listed to the left of the chart.
The second chart, Amount, is a breakdown of the cash value of each stage mentioned above. The chart will show a percentage of cash value for each stage, and to the left of the chart it will show each stage and their total cash value.
The last chart, Awarded by Salesperson, shows the number of quotes awarded on the Y-axis and the salesperson associated on the X-axis.
Status Update
Detailed information regarding Status Update tab
Here you are able to mass select orders to quickly change many order's status to inactive or closed. Typically used for old orders, and you are able to filter down by setting a Last Haul Date, Region, and Customer.
Last Haul: Will query orders that have not been ticketed for within the given time
Inventory
Detailed information regarding the Inventory tab of the Inventory module.
Here you are able to filter down which products you are tracking inventory for by setting a Region, Location, and a Through Date.
Once you have established which parameters you would like to filter by the associated products will populate in the table below. You can select one of the products on the first table, and this will populate the Set/Adjust/Receive/Produce and Tickets table at the bottom of the screen.
In the Set/Adjust/Receive/Produce table you are able to create entries for your inventory. These entries are, just as the name of the tab implies:
Truck Bulk Edit
Detailed information regarding the Truck Bulk Edit tab of the Trucks module
Here you are able to make bulk edits to the License Expiration, Insurance Expiration, Status, and any UDFs you have set up for trucks.
The Bulk Edit screen defaults the presented trucks to those that have an Active status, and defaults to showing All haulers. You may change these to view trucks you have set to Inactive, or you can narrow down the results by selecting a specific Hauler's trucks to be returned in the table.
As an example I have set the Hauler to our Quarry's Loading Hauler, as the two trucks under that hauler have hit their expirations.
We will be updating the License and Insurance Expirations, as well as changing the UDF "Test" value. Utilizing the calendar dropdown you are able to set the new dates, and if you are using any UDFs you may enter an appropriate value for your company's needs.
Dispatch
This module allows you to manage and track trucks, haulers, and the deliveries requested. Before a truck can be used for Requests, you will need to enable dispatching for both the Hauler and Trucks.
Requests
This section allows the overall management of the Dispatching module. From here you can add trucks to be requested, submit and alert drivers of new Requests, and a summary report of all Requests.
Live Tracking
Live Tracking with Requests will allow you to monitor your Trucks as they progress on their assigned Dispatch.
In the Live Trackingmenu, you can view your active haulers as they progress and complete their dispatches. This page will display their current location, as well as what route they've taken to their destination and when they started and stopped their haul.
Tracking Query
The Tracking Query provides a more precise view of your dispatched drivers and the actions taken on their route. This menu will allow you to specify the Region, Hauler, Truck, and date range for their activity, as well as defining their Last action or All actions. You can further define this by selecting the Type to display their Pickup, Delivery, and Tracking.
After inputting the desired parameters, you can use the [Query] button to review the information in the table, or use the [Map Results] button to view the results represented on a map.
Using the Tracking Query can be helpful to provide a timestamp of your dispatches to provide updates to your customers or review any issues or delays in your deliveries.
Billing/AR
Billing
Billing allows you to batch tickets based on selected criteria to be invoiced or review your previous billings. You can adjust the to show a break on the invoice between different presets that can be selected when querying tickets. Billing History is also where the Credit/Rebill option is contained.
Customer Credit
The Customer Credit section allows you to apply credits or debits from your customer accounts. These could be manual adjustments for applying a "good customer" credit, an over payment on an invoice, or deductions for various fees.
When selecting a customer, you will need to click the search icon and select the customer from the list, or enter their customer information in the new window.
Then, you will apply the credit or debit by clicking the [+New Transaction] button.
In the new window you will select between the transaction date and type, then apply the amount and a description of the transaction as a reference. A transaction date can be selected for a future date if you wish for the credit to be available at a later time.
Requests
The Requests table is the main screen for managing Dispatching. Here you can view and edit your Requests at-a-glance. You can add new trucks, alert drivers, make changes, or review individual truck requests.
Trucks
The Trucks table provides an overview of your Requests organized by the assigned Trucks. Here, you can quickly review how many Requests a Truck has for a set time frame, add the Truck to an existing Request, and edit the Truck's existing Requests
Whiteboard
Your Requests Whiteboard provides a different view of your Requests. Here, you can see summary cards of the Request, as well as make edits to the Request and send alerts.
Drivers
Allows you to add or edit drivers available per Hauler, as well as set them to active or inactive depending on their availablity. This section includes adding their phone number used to send SMS messages and alerts related to each assigned Request.
Live Tracking
Live Tracking provides location data based on the position of the Request. With the Lat/Long selected, the Request can be tracked from the time of pick-up to delivery. With the map provided by Microsoft Azure, you can view any traffic or weather conditions that may be affecting the delivery.
Tracking Query
The Tracking Query allows you to view all tracked Requests and their event history, including Pickup, Start/Stop, and Delivery date and time for each request. This also provides a map of the GPS location at the event time for review.
Request Import
The Request Import allows uploading of previous Requests from a .CSV file.
Dispatching is an additional module that will need to be added to your Fast-Weigh subscription. If you are interested in adding this module, please contact us at 865-219-2980 or [email protected]
New Payment
Allows batching tickets across your customers, orders, locations, and dates. When creating a batch, it is best practice to list the Batch # as the date of the batch creation to reference easier.
Billing History
Allows you to review previous batches based on the date, batch number, or specific invoice. This area also allows you to begin the Credit/Rebill process.
Balance Dashboard
This section allows you to review pending payments and statements across your customers, and allows you to print physical copies or send emails to the associated customer contacts.
New Payment
Allows you to enter payments through the Web Portal for your customers balance based on the selected invoices and tickets.
Invoice / Payment Query
The Invoice / Payment Query functions similar to the Ticket Query. Having an invoice or Batch to reference will allow you to view the transactional data, apply adjustments, or update its status.
Payment Export
Similar to the New Payment batching, batching tickets and payments to export to your external AR software can be achieved in this section, which also allows you to review previous batches and their content.
Customer Credit
If your customer overpays, has a late payment, or requests a refund, this can be managed in the Customer Credit screen. Selecting the customer will display the amount owed, and will change based on the credit or debit option selected.
Billing is a default module in Fast-Weigh. To expand your AR and Invoice features, please contact support at 865-219-2980 or [email protected].
Select all the parameters that contain the tickets that need to be billed and click [Query]
Review tickets that are selected to ensure that they are ready to be billed
Type in a Batch # and select the appropriate Invoice Date and GL Date (if applicable)
Click [✓Assign]
Fast-Weigh automatically breaks out invoices within a batch based off your "Invoice Break" configuration. This can be edited under Billing Settings from the Portal Settings
Select the Region and Customer, then click [Refresh]
Click the [Statement] button to generate a statement with the customer's current balance
Statements
"
Select all the parameters that contain the tickets that need to be billed and click [Query]
Type in a Batch # and select the appropriate Payment Date and GL Date (if applicable)
The tickets will be removed from the New Payment tab and placed inside a batch in the Payment History section
Search for tickets utilizing the filter drop-down menus and click [ Query ]
3
Select Tickets
Identify the tickets that need to be edited and select them by either clicking [Select All] if all the tickets in the table need to be edited, or simply check the box next to each ticket that needs the edit.
4
Make Changes
Next you can make changes to the required fields Region, Order, Product, Location, Tax Code, and Ticket Date. Optional fields you may edit are PO Number, Job, Phase, and Cost Type.
5
Click [ Save ]
Search for ticket via drop-down menus or ticket number
3
Click [ ✎ ] icon in the Edit column
Make any necessary changes to the ticket and leave a Revision Note
Note: This will only affect the product that is ran off of this order and will not affect your
Navigate to [ Billing History ]
3
Click [ Email ]
Find the appropriate Invoice and click the [ Email ] button
4
Select a Report then Click [ Select ]
5
Click [ Ok ]
After clicking [ Select ] from the previous step, the email should have sent, or is at least now queued to be sent shortly ( usually under 10min ). Click [ Ok ] to finish.
Clearing Unsynced Records
Clearing these Unsynced records can be done two ways: Clicking the larger Clear All Errors button, or per record by clicking the eraser icon from the Clear Error column. Some of these unsynced records can also be cleared by others being resolved, so in some cases, a Washington error that persists may be resolved from another Unknown record.
Once the error is resolved, you will see a brief pop-up in the top-middle of the ticketing app. This message will display that the error could not be cleared, or that the error has been cleared. Following this, you can click the Full Sync button to sync your app, which will attempt to sync the tickets with the Web Portal.
Unknown Errors are the most common codes that will appear in the Unsyced record page. These codes are generally caused by a lost internet connection and can be resolved by clicking to clear the error, then syncing the ticket. In some cases, these may return.Should the records fail to sync or return after being cleared and the Full Sync completing, please give our support line a call at 865-219-2980 whenever is most convenient.
If the Error Code listed on the Unsynced Record displays anything other than Unknown Error or Washington, please call our support line at 865-219-2980 so we can assist in resolving these errors.
This graph presents you with how many minutes your trucks have been actively in the yard. Trucks are set "In Yard" via the Desktop Ticketing App, and once they have been marked "in yard" they will populate in this graph. The minutes a truck is in the yard are represented along the y-axis, and the trucks are listed along the x-axis.
The trucks represented by blue bars are not loaded with material and are in the yard.
The trucks represented by green bars are loaded with material and are in the yard.
Loads Per Loader Graph
Loads Per Loader Graph on Load-Out Dashboard tab
This graph represents how many loads a Loader has completed in a day. Along the y-axis are the amount of loads, and along the x-axis are the loaders.
Load-Out is an additional feature. If you would like to add Load-Out to your Fast Weigh subscription contact us at 865-219-2980 or [email protected].
Load-Out must be configured on the Ticketing Application before use.
Load-Out Dashboard tab
Minutes In Yard Graph on Load-Out Dashboard tab
For trucks to be labeled as Loaded you must have a "Loader" marking the trucks as Loaded in the Loader app.
You must have a Loader App set up for a loader to populate on this graph.
If you are interested in adding Load-Out and the Loader application to your Fast Weigh subscription please contact us at 865-219-2980 or .
You are able to use the filter parameters at the top of the page to narrow down to a specific Region, Location, Product, and Salesperson. You can set specific date ranges using the date selectors, as well as using the MTD, YTD, and QTD buttons.
You are also able to create a new quote from the dashboard by clicking the in the top right.
Quotes - Salesperson table view
Quotes - Customers table view
You can alternate between a Salesperson and a Customer view of the table at the bottom of the dashboard screen.
The first tab of the table view, Salesperson, lays out all of the stages of quotes per salesperson. Each stage column shows the number of quotes in that stage, as well as the cash amount for each stage. At the bottom of the table, it has the totals for each number of quotes and their cash amount.
The second tab of the table view, Customers, is similar to the Salesperson tab. The only difference is that this table lays out all of the stages of quotes per customer. This gives you the Customer ID and Name as well as the number of quotes and their cash amounts.
The Quotes Module is an additional feature that can be added to your Fast-Weigh subscription. If you would like to purchase the Quotes Module add-on contact us at 865-219-2980 or [email protected]
Quotes Dashboard screen
Region
: Narrows down search to only include set region
Customer: Narrows down search to only include set customer
Include Open Orders: Check this to include orders that are set as open to price updates
Set Selected To: Update the order to be inactive or closed
Status Update table
Once you have set parameters and clicked Refresh, the table will populate with orders you can change the status for. If you click the arrow on the left of the table it will expand the order to show details regarding the product(s) on the order.
Once you have selected all of the orders you wish to change the status of you can click the Save button in the top right.
Status Update filter parameters
Set: You can set your starting inventory with this
Adjust: Used to adjust inventory - Use positive values to increase inventory and use negative values to decrease inventory
Receiving: Used to account for receiving inventory if you are not utilizing inbound ticketing
Production: Used when adding inventory for materials produced internally.
You can set the Date, Reference, Quantity, and add a Note. Use the reference for your internal record keeping, and a note can be any useful additional information.
The Quantity is based on the units of your product (Yard or Ton).
Inventory filters and table
Must Set inventory for tracking to begin, and inventory will be adjusted automatically when ticketing on inbound or outbound orders.
Once you have updated the relevant information simply click the "Save" button.
Bulk Edit Update Successful
Truck Bulk Edit Screen
Bulk Edit Example
WARNING - Any edit made in the Bulk Edit screen must apply to ALL selected trucks. If the trucks will have different expiration dates you must update these individually.
Overlays
Within the headers at the top of the page are a few optional overlays. These allow for more active dispatchers to view real time conditions, such as Traffic and Weather.
Traffic
The Traffic overlay will display various issues affecting the roadways that your trucks and haulers may use when dispatched. Clicking on an icon will provide the reported issue, such as roadwork or traffic delays and accidents. This can be beneficial for providing updates on a delivery to your customers, or helping the driver navigate through these delays with alternate routes, if available.
Weather
The Weather overlay can help to provide a view of any expected or unexpected weather in the delivery area, or route that your drivers may need to take as they complete their dispatch.
This Live Tracking menu is provided by a third-party GPS system. The accuracy of local road and weather conditions is not guaranteed and should be independently verified when necessary.
This image is an example showing a few trucks on active dispatches, as well as two that have been completed and are returning to a location to pick up another.
The icon legend above are the icons that are used to represent a trucks route
Map Results
When clicking the [Map Results] button, this will display all results from the table. The map can be zoomed in or out to provide more or less information in the area selected, and over over an icon will provide information related to the dispatch.
Query Results
When clicking the [Query] button, the table below the parameter selections will display the results of those selections. You can further search these results by using the Search field at the top left, or by using the Filter icon for each column.
The columns available will provide the following information:
Hauler: The Hauler associated with the dispatch.
Truck ID: The truck actively used on the dispatch.
Type, Date, and Time: The action taken and when it took place.
Map - A visual representation of the action taken. Clicking this icon will display the location of the action.
You can select a different overlay in the upper right-hand corner of the Map Viewer window.
After the transaction has been saved by clicking [✓Update], it will reflect those transaction details in the main table, including the date, type, description, amount, the created date, and the user who initiated the transaction. This information can also be referenced through our reporting tool under the Accounts Receivable category.
Click the image to expand.
Tutorials Overview
This section of our Knowledge Base is dedicated to new users of our software. Our tutorials will show users the basics of how our software is used without overwhelming them with information.
What is Fast-Weigh?
Fast-Weigh is cloud-based ticketing software, built to make your aggregate operation faster, simpler, and more efficient than ever. Our goal is simple: less stress, and more time to focus on your business. That means no expensive IT infrastructure, total access to your production data, and a modern, user-friendly system that will change the way you think about material sales.
Platform Overview:
Centralized Web Portal
With our cloud-based system, your ticketing data will never be stuck in the scale house again. View, edit, and analyze ticket data from all locations. Enjoy total operations management from anywhere, on any device.
Key Features:
Ticket Management
Order & Customer Management
Products & Pricing Matrix
Desktop Ticketing App
Our Windows 10/11 ticketing application was designed from the ground up to streamline daily scale house operations and communicate directly with our web portal. All data is immediately backed up to the cloud, ensuring no ticket ever goes unaccounted for.
Key Features:
Backed by the Cloud
Offline-Capable
Hardware Accessories
Add on Modules
Billing & Invoicing
Inventory
Analytics
Vocabulary
Customer: Purchaser of your Products
Region: The highest Level of the Location Hierarchy. Regions contain Locations. Regions can be used to segregate by proximity or by billing entity.
Location: Middle Level of the Location Hierarchy. Typically refers to a Quarry/Pit. Locations contain Yards. Locations are also the level at which global products can be assigned.
Yard: Lowest Level of the Location hierarchy. Yards can be used to segregate activity at a location. A yard is created automatically when you create a location but more can be added if needed.
Product: Material being sold
Hauler: Carrier/Owner of Trucks
Truck: Vehicle belonging to a Hauler
Order: Combines Customer and Product to create a Job that can be ticketed. Orders are region specific but can contain products from multiple locations as long as they are in the same region
Ticket: Receipt of Sale/BOL/Weigh Slip/Tag
Batch: Group of Invoices. You may hear the billing process be referred to as Batching. This is simply the process of searching for tickets and assigning them a Batch #.
Report: Document generated by Fast-Weigh that displays data for easier interpretation. Our report building software is also used to create Ticket Templates, Invoices, Statements and E-Tickets.
Generating Reports
Getting the most out of Fast-Weigh with the Reporting Module
Navigate to Reporting > Reports - New Tab
Category: Our reports are grouped into several categories such as Tickets, Billing, and Audit
Report: Selecting a category changes the reports shown in this list
After Selecting a Report Click the "Load" Button:
The Parameter Panel will appear on the right side of your screen:
In this example, we are looking at the "Product Usage" Report in the "Tickets" category, the parameters shown will vary by report. We have set the Date range for September but we have not selected our locations so we will see this error if we run the report:
You can select individual, Regions Locations and Yards or just click the select all button for the parameter:
Click Refresh at the top of the Report Parameters to view the report:
We can add a grouping to this report in the Report Parameters:
Select Customer and Click Refresh to run the report again to see the data grouped by Customer record:
The Navigation Bar above the report offers some time-saving features:
The Page Number buttons allow you to jump to the Next/Previous or Last/First pages
The Cloud Icon allows you to export the Report in a variety of different file formats such as PDF, CSV, and XLS.
You can also print the report or email it directly from the reports module:
How to Create and Pay ticket from New Ticketing App
How To Create and Pay Ticket from Fast-Weigh
1
Click [ Create and Pay Ticket ]
2
Redirect to Portal
After clicking the [ Create and Pay Ticket ] button, a new tab should open up in your browser to the Fast Weigh Portal, with the ticket created in the scale app already invoiced and selected
3
Select a Payment Method
Select the appropriate Payment Method from the dropdown
Payment Method
Description
4
Click [ Create Payment ] & [ OK ]
5
Finish
A Receipt PDF should now be downloaded
Related Guides
References
Creating a New Product
Your Products will be the material selected when ticketing. You can create an unlimited number of Products and assign them to your Locations and Orders, as needed.
How to Create Products
Navigate to "Resources" > "Products" > "Products & Pricing"
Navigate to the Product Setup
Click the [+New Product] button
The minimum required fields to add a new product are Product ID, Description and Unit
Click [✓Update]
Assigning Products to a Location
After a product has been created, it will need to be assigned to a location. This will be where you will be ticketing the Products.
Select the product you just created and click the [+Add Location] button in the middle tab
The minimum required fields are Region, Location, and Yard
Click [✓Update]
Once the Product Location is set up, make sure to set up default pricing for the product
Creating Payments
With the Fast-Weigh AR & Payments module, you can handle invoice payments directly through the Fast-Weigh Web Portal via Cash, Credit, or ACH.
How to Create Invoices within New Payments
Tickets must be on an invoice in order to collect a payment. This article covers adding tickets to an invoice from the New Payment screen first. If your tickets are already on an invoice, skip to step to the next section ()
Navigate to "Billing" > "New Payment"
Navigate to the Tickets tab
Select the Region and Customer, then click [Refresh]
Select the tickets you want to invoice. Ensure the invoice distribution and invoice date are correct, then click [Create Invoice]
This will automatically navigate to the Invoices tab and select the invoice(s) generated
How to Create a New Payment
If you don't already have the invoice(s) selected. Select the Region and Customer, then click [Refresh] and select the invoice(s)
Select the Payment Method being used, ensure that the amount is correct and click the [Create Payment] button
Customers
Welcome to Fast-Weigh! Fast-Weigh is the cloud-based ticketing application that your merchants use to generate tickets, orders, quotes, and invoices. To help in our explanations on this page, we will refer to your merchant as the "Tenant" of your account, and your role as the "Customer." As a Customer, you are granted access to your company's specific Fast-Weigh related data. In this article, we will provide an overview of how you can use the Web Portal to review that information. All aspects of the Customer portal will be available for reference, though our Tenants have the ability to apply select restrictions based on their preferences. If you do not have access to a section of Fast-Weigh, these restrictions may be applied at their preference and discretion.
Home / Dashboard
After receiving your login and welcome email, you will have access to review your company's information within Fast-Weigh. The image below is the Home screen, also referred to as the "Dashboard," that will provide a snapshot of that information. We will review this page in a moment, but first, we'll take a look at what pages we have available.
Clicking on the links along the dark blue navigation bar across the top of the Web Portal will redirect you to that section. Below is a quick reference you can use for navigating the Web Portal, or click on each section below to be redirected to the associated article for that page.
Home: This page displays an overview of your company's production information.
Tickets: This section contains the Ticket Query and Delivery Query, where you can review your ticket data.
Ticket Query: This page allows you to run a search using granular parameters to display your ticket information. You can review how to use the Ticket Query by navigating to the Ticket Query for Customers article.
Note
Fast-Weigh Support is available to our Tenants. We are unable to provide direct support to our Tenants Customers. The articles included in this section of our Knowledge Base should act as supplementary references to use the Customer Portal.
Any questions related to your tickets, orders, or billing should be referred directly to your Tenant to review.
Home / Dashboard
The Home page of Fast-Weigh's Web Portal, also referred to as the Dashboard by some of our users, provides an overview of your company's tickets and orders primarily, but also provides a review of the products and their quantities, where they came from, and who hauled them. You will notice that there is a "1" in the box showing the Active Customers. This is set by default, and includes onlyyour company's information within your Tenant's instance of the Web Portal.
Some of our Tenants have shared customers, and the Customer Portal is specific to each Tenant. If you were invited to access your company's portal by more than one Tenant, please make sure you are logging in with the correct or associated login for that specific Tenant. If you are unsure what this login information may be, you will need to reach out to your contact, or known Admin, with that merchant to have that information provided or reset.
The upper section has a few options available to manipulate the displayed data. In some cases, there may be multiple selections available based on the Tenant's Regions and Locations, or where they operate and produce or sell product. Selecting an ALL option will display all records within the selected date range. After making these selections, you will need to click the [Refresh] button, found on the upper right of the page. The Totals cards below these options provide a quick digest of the reported information.
The middle and lower section of the Home page provides a visual breakdown of the information displayed in the Total cards above, including overall product quantities and the Units by Time. The middle section can be tabbed through to display more specific information, such as the Units and Loads of products, the number of active orders, and Locations where your products were purchased or produced. You can click through the tabs in the table below to see how each tab behaves when toggled to view.
Each line listed within these tabs also has a [🔍]icon on the right side. Clicking this icon will instantly redirect you to the Ticket Query and display the tickets that contain this information within the selected searched parameters, without needing to input the parameters individually as you would normally when using the Ticket Query.
The products and their quantities displayed are specific to your orders.
The Customer tab will only display your company's information.
The Orders tab will display the totals ticketed per product. Each line will show a separate product, if your orders have multiple products that have been ticketed.
If for any reason when using the Home /Dashboardpage you notice information that is not relevant to your company, please reach out to the contact or known Admin for your Tenant, and we can work with them to correct any errors or unexpected behavior.
References Overview
Fast Weigh Web Portal
The Fast Weigh Web Portal is a browser based tool used for administration of your Fast Weigh account. The Web Portal allows users to invoice, generate quotes and reports, manage trucks and haulers, or track inventory. The Web Portal has a variety of applications standardized for most businesses, and a catalogue of additional modules that can be requested as needed.
• Fast-Weigh Web Application ( New Ticketing App )
The Scale Apps are primarily used for ticketing at a scale house. You can use the tabs below to follow the Reference Pages for the edition of Fast-Weigh you use.
In the Reference menu, you will find a complete breakdown of each section and menu option within the Ticketing App.
In the Reference menu, you will find a complete breakdown of each section and menu option within the New Ticketing App.
Mobile App
The Fast-Weigh Mobile App is a versatile Mobile version of Fast-Weigh that can be used in three distinct modes to best suit your needs. See the table below for a full breakdown.
Mode
Description
Management App
With the Mobile Management app, you can have all your latest ticketing data at your fingertips at all times. Stay up to date on daily load and unit counts, truck activity, and more
Hardware
There is a lot of external Hardware that can be used to enhance the Fast-Weigh experience. Follow the References below to see our recommended Hardware.
Accounting Interfaces
Fast-Weigh integrates directly with many Accounting Interfaces, namely Quickbooks. But you can find all of the different Integrations following the link below.
Integrations
Loader App
Current
Detailed information on the In-Yard tab of the Load-Out module.
Here you are able to see a table view with all of the trucks that are currently In-Yard. You will see the Truck ID, Hauler, Beacon ID (if applicable), when the truck entered the yard, when the truck was loaded, how many minutes in yard, order details if the truck is assigned to an order, and the Loader ID.
In-Yard table in Load-Out Module
Applying Filters
Filter Drop-down menus
Region - Drop-down menu for Region selection
Location - Drop-down menu for Location selection, a Region must be selected for this menu to populate
You can utilize the filter funnels at the top of the table to narrow down your search further.
Below is an outline of each item on the table:
Field
Description
Delivery Query
Detailed information on the Delivery Query tab of the Tickets module.
Delivery Query is part of our Proof of Delivery module. If you would like to add Proof of Delivery to your subscription contact us at 865-219-2980 or
Delivery Query and Map Results
Here you are able to view tickets that have been delivered or are currently still in transit.
Delivery table in Delivery Query
You are able to filter by Region, Location, Date, Status, and Order # to narrow your search down.
To view tickets that are only a part of a POD order leave the POD Orders Only box checked. If you uncheck this box you will see tickets that are not a part of a POD order.
Each status is the following:
Not Received - The ticket is still in transit to the delivery location
Accepted - The ticket has reached the delivery location and has been accepted by the recipient
Rejected - The ticket has reached the delivery location and has been rejected by the recipient.
If you click the button you will be able to view a map of where the ticket was received.
If you hover over the Ticket # in the Map Results you will be able to see some details on the delivery:
You will see the ticket number, who it was received by, and the date and time.
Map and Archived Ticket
Another way to view where a ticket was received is by clicking the button in the Delivery Query Table. This will pull up the same Map Viewer from earlier but show only the specific ticket you are looking at.
You may also view an archived ticket by clicking the button. This will download a PDF of the material ticket.
Image and Signature
Ticket Entry
Detailed information on the Ticket Entry tab of the Tickets Module.
The Ticket Entry tab is a useful tool that can be utilized to enter tickets quickly. An example that would lead to the use of this tab would be if the scale house had to write paper tickets for a day or a portion of the day.
Ticket Entry screen
There are two sections to this screen. On the left is where you will enter the details of the ticket needing to be entered into the Fast Weigh database, and on the right is where the tickets will be stored until you are ready to save them to the database.
Ticket Entry in the Web Portal
Once you have filled out all of the necessary fields for the ticket you just need to click the button. This will store the ticket in the table to the right.
The ticket detail information will remain filled out with all the previously entered information except Ticket # and Net Units. This is so that you may enter multiple tickets for the same customer quickly.
Ticket Table in Ticket Entry
Once you have added your tickets to the table you have a few options. You can either Edit, Delete, or Save the tickets in the table.
To edit a ticket that is in the table you simply have to click on the ticket and the information on the left side will populate with that ticket's information. You may make any edits to this ticket and click the button.
To delete a ticket you just click the button. You will be given the following prompt:
If you are certain you need to delete the ticket you can click OK and the ticket will be removed from the Ticket Entry Table.
To save the tickets to the Fast Weigh Database click the button at the bottom of the table. Once you save the tickets to the database you will be able to view these tickets in your Ticket Query and bill/invoice them as you would any other ticket.
Ticket Import
Detailed information on the Ticket Import tab of the Tickets module.
Here you can build an interface with files from an older ticketing system, or with an external company's ticketing data you need to record.
You will first need to create your import format before you can import tickets.
Ticket Import Page
Format - The import format you created for a given customer.
Region - The appropriate region that will apply to the customer you are importing tickets from.
Location - The appropriate location that will apply to the customer you are importing tickets from.
Yard - The appropriate yard that will apply to the customer you are importing tickets from
Overwrite Date - If you would like to overwrite the date that is in the import file, you may set that here.
Overwrite Hauler - If you would like to overwrite the hauler that is in the import file, you may set that here.
Add New Trucks - If the truck(s) listed in the import file aren't already, you may check this box to add the truck(s) to your Fast Weigh system.
Above reflects what the import table will look like with a successful import with no errors. Each ticket will have a green check beside it. You may also Edit or Delete any ticket in this table before Saving.
Above reflects what the import table will look like with errors. Each ticket with an error will have the red "x" icon next to the ticket number. The reason for the error will be listed in the Errors column next to the Edit button.
You can edit tickets in the import table by clicking the button:
You may also delete any tickets in the import table by clicking the button.
Upload - This button will upload the tickets found on the import file to the import table
Re-Verify -
Save - This will save the tickets in the import table to the Fast Weigh database, and the tickets will be able to be viewed from the Ticket Query
How To Guides
Ticket Bulk Edit
Detailed information on the Ticket Bulk Edit tab of the Tickets module.
The Ticket Bulk Edit tab allows you to query and edit multiple tickets in one go.
It's easiest to think about the Ticket Bulk Edit menu in 1/3rds:
Ticket Parameters (Top Third): Just like the Ticket Query, this is the information you would like to result in the middle table. You can input as much information as needed to have the results display the tickets you would like to edit.
Query Results Table (Middle Third): These are the results of your Query.
New Parameters (Lower Third): These are the new values you wish to apply to the selected tickets from the Query Results Table.
Once you have queried for the tickets you are looking for, you can use the or buttons to either select every ticket present in the table or clear all selections to easily pick the specific tickets you would like to edit.
Editing tickets in Ticket Bulk Edit
You can make any changes to Region, Order, Description, Product, Tax Code, and Ticket Date that is necessary.
You can change PO Number, Job, Phase, and Cost Type though these fields are not required.
Once you have made any necessary changes click the button, and the tickets will now show the updated information.
How To Guide
Haul Zones
Detailed information about the Haul Zones tab.
Here you are able to create variable custom freight and hauling rates to be assigned at the ticketing level.
Haul Zones must be enabled in Portal Settings to be utilized. Once Haul Zones has been enable you will see the Haul Zones option in Orders dropdown menu.
Haul Zones window
Setting up Haul Zones
You must first select Region and a Location to create your haul zone. Haul Zones are tied to Locations. Once you have done this you can click + New Haul Zone and fill out the following:
Name: Give your haul zone a name
Description: Provide a brief description about the haul zone
Freight Charge Rate: Amount customer pays for shipping of material, and can be set to per unit or load
Editing Haul Zones
Find the haul zone you would like to edit in the table and click Edit.
This will open a window identical to the New Haul Zone window where you can make changes to the selected haul zone.
Deleting Haul Zones
Find the haul zone you would like to delete in the table and click Delete.
Exporting Haul Zones
If you would like to get an Excel sheet for your records you can click Export to Excel to download an Excel sheet that looks like the below sheet.
Assignment
Detailed information on the Assignment tab within the Trucks module
Here you are able to assign trucks to particular Orders and Order Products, and this makes it easier to ticket on this truck as the scale operators will only need to enter the Truck ID when ticketing on the assigned truck.
Assignment table
When you click on the Assignment tab you will see a table with all of your assignments listed, and you are able to Search or use the Filter Funnels to narrow your search to a specific assignment. You are able to clear an assignment by clicking the "XClear" button in the assignment table.
Adding a New Assignment
To add a new assignment click the "+ New Assignment" button on the top right of the assignment table:
Once the new assignment window has popped up you may fill out the information for the truck assignment:
Region - The region the order and customer for the relevant product to be selected
Order - The order for the relevant customer and product to be selected
Product - The desired product you would like the truck to be assigned to
Once you have filled out the above fields you just need to check one or more trucks to be assigned to the order product, and once you click "Save" the truck(s) will now be assigned to a specific order product!
Assignment on Ticketing App
Here will just be a quick example of how the truck assignment translates to the Ticketing App, and how it will look to the scale operator ticketing the trucks.
Above is how the ticketing app appears before ticketing. The truck assignment cuts down on the time it takes to set up a ticket for a specific truck. Using the example in the previous image of the assignment table:
When ticketing on a specific truck that has been assigned to a product, the ticketing app will automatically fill out the Customer, Order, and Product fields so that the operator should only need to enter the weight of the truck.
Clearing an Assignment
To clear an assignment simply click the "X Clear" button in the assignment table on the assignment you wish to clear.
Click "Ok" on the pop-up and the assignment will be cleared, and once the Ticketing App has been synced the truck will no longer populate the Order, Customer, and Product automatically.
Hauler Pay
Truck Adjusments
This area allows you to add or deduct from the Hauler Pay based on preset values entered during Setup. You would typically use this for any rate changes or unforeseen costs that a Hauler might encur during delivery such as toll roads.
Statements
Similar the screen, this allows you to generate a new Hauler Payment, review previous payments, or batch and invoice tickets.
Setup
Table of Contents
Truck Adjustments
Statements
Setup
Truck Adjustments
Adjustments can be made to hauler pay rates after creating the type of adjustment during Setup. These adjustments can be created for various reasons, such as extra miles or minutes driven, or unforseen costs related to toll roads.
Statements
The Hauler Pay module allows you to organize groups of tickets into batches for invoicing a Hauler, much like the Invoicing module, based on Haul Rates set for orders.
Setup
Setup allows you to create or edit Hauler Pay adjusments as additional costs or deductions.
Jobs & Phases
Detailed information for the Jobs & Phases tab.
Jobs
Job table
With the job table you can see jobs that have already been created. If you click + New Job you will be able to create a new job by filling out the following window:
New job window
Job #: Give the job a unique number
Company: Name or ID of company job will be for
Description: Give a brief description of the job here
Active: If checked the job will be able to be included on orders
Phases
To be able to see phases you must have a Job highlighted. If the Job was just created your Phase Table will be empty and you can hit + New Phase and fill out the following window:
Phase: Can be alphanumeric and adjust to your company's needs
Description: Brief description of the phase
Cost Types
Creating Billing Terms and Modes
Set up your payment terms and billing modes. These terms and codes should be set up in conjunction with your Accounts Receivable Terms Codes.
How to Create Payment Terms
1
How to Update Pricing
Before you can add products to an order, they must have default pricing set up for the locations where those orders will be ticketed.
Managing Product Pricing
Requests
Using the Request Page
The Requests menu allows you to review your existing request progress or input a new request to your merchant. By default, this menu will display only your Active requests, but can be adjusted by selecting from the Status menu to view more. As with all areas of Fast-Weigh, you will need to input a range of dates to include any information that you may need to review or reference.
Included are a few quick one-click selections to review the most recent Requests. Clicking the [Today], [Tomorrow], or [7-Day] options will automatically refresh the page to display these specific filtered Requests. You can also use the date selection and manually refresh the page with the [Refresh] button to view older requests.
In the example image below, we have two requests: One active request shown as Open, and one that has not yet been approved by the merchant, shown as
History
Detailed information on the History tab in the Load-Out module.
Here you are able to view when trucks entered the yard and were ticketed out.
Field
Description
Balance Dashboard
Reviewing Your Outstand Balances
The Balance Dashboard page allows you to review your outstanding invoices, check your Customers' Credit Standings, and navigate directly to the screen.
Across the top of the screen, you will see a complete overview of all of your outstanding invoices, organized by the number of days since the Invoice Date.
Multi-Tier Location Support
Unlimited Users
In-Depth Reporting
Multi-Scale Support
Highly Customizable
Hauler Pay
Quotes
Dispatching
Load-Out
Mobile Applications
Fast-Weigh may refer to records differently than your previous system. This list may help you become familiar with our terminology.
Ticket Mode
For general scale house ticketing on the go
POD Mode
Allows you to capture a record of material deliveries via mobile phone
Haul Mode
For managing dispatches and Order Requests
For assistance within the Web Portal, Desktop Application or Web Application, please contact Fast Weigh Support by emailing [email protected] or by phone at 865-219-2980.
The Customer is paying in Cash, no extra action is needed in the Web Portal
Check
The Customer is paying via Check, no extra action is needed in the Web Portal
Card
The Customer is paying via Credit Card. When you click Create Payment you will be prompted to enter their Credit Card information to process the payment
ACH
The Customer is paying via ACH. When you click Create Payment you will be prompted to enter their ACH information to process the payment
Terminal
The Customer is paying via a connected Card Reader or other POS Terminal
This button will only appear if the ticket Pay Type is Cash, Check, or Credit Card
If this new tab doesn't open, make sure popups are enabled on your browser
The product must be added to the location it is being ticketed out of. Mutiple locations can be added to the same product and vice versa
Delivery Query*: This page allows you to run a search and review, similar to the Ticket Query, using associated parameters, for any tracked delivery from your Orders and Requests.
Request*: This page allows you to review your existing Requests or create a New Request from an existing order.
Invoices*: This page allows you to review your created and available invoices, either by searching across a selected date range, or using a specific invoice number.
Payments*: This section contains the following pages surrounding making payments directly in Fast-Weigh.
Balance Dashboard: This page is similar to the Invoices page, but provides a larger amount of data available related to your current balance with your Tenant, such as any overdue amounts.
Query: This page provides a closer look at your invoices, the tickets associated with each invoice, and payments made toward those invoices.
New Payment: This page allows you to directly make payments toward your invoices within Fast-Weigh.
Customer Payment Info: This page allows you to create and enter any saved** payment information you would like for future payments in Fast-Weigh.
Reporting: This page will open in a new window and allow you to run a set of default reports that can provide more visually digestible information regarding your company's orders, tickets, etc.
Items marked with an asterisk* can be restricted at your Tenant's discretion. These pages may not be available to you based on their preferences or their current system needs. If you have any questions about your visibility, please reach out to your Tenant so we may communicate or troubleshoot with them directly.
Payment information entered into the Fast-Weigh Web Portal is not stored in our system. The contact information that is entered with the payment method are only saved as a reference, with the actual payment method information being stored by our payment partner, Basys.
Upload, Re-Verify, Save, and Cancel buttons in Ticket Import
Please be aware of tooltip icon next to the Region selection in the New Parameters.
"The fields in this column are no longer required when bulk updating tickets. Note that changing these fields and/or the Tax Code will reprice all selected tickets."
If you do not wish to reprice the tickets, you may need to make individual adjustments or address any pricing changes as a result of the Bulk Edit by using the Reprice tools on the Ticket Query and New Billing menus.
Any ticket that is checked will take the edit, so ensure you have selected the appropriate tickets you would like to edit before making changes.
Hauler Pay Rate: Amount owed to an external Hauler, and can be set to per unit or load
Active: Leave this box checked if you intend to use the haul zone
Update once you are done
You will only be able to delete Haul Zones that have not already been ticketed on.
See below error message when attempting to delete one of these Haul Zones.
New Haul Zone window
Haul Zones table
Haul Zones table
Haul Zone Error
Haul Zone options
Exported Haul Zones Sheet
The truck will remain assigned to the particular product until the assignment has been Cleared from the assignments page
New Assignment pop-up window
Fast Weigh ticketing app
Truck assignment example
Clear assignment pop-up
Phase table
New Phase window
Cost type table
The Trucks tab will show you what trucks your Tenant has selected during ticketing. This list may contain trucks they own, trucks you own, or a third-party Hauler.
The Locations tab will display the locations where your purchased products were provided or sold, as well as the total amounts from these locations.
Please note that Fast-Weigh uses the US Standard language available in your browser and will not automatically detect and correct incorrect or international date formats. If you encounter any issues when using the Fast-Weigh portal, you may be using a different language pack in your browser. You can adjust this in most browsers Settings -> Languagemenus.
When the truck has entered the yard
Loaded
When the truck was loaded in the yard
Minutes
How many minutes that the truck has been in the yard
Order #
The order number assigned to the truck
Order Description
The description/title of the order assigned to the truck
Customer
The customer associated with the assigned order
Product
The product that has been assigned to the truck
Loader ID
The ID associated with the loader that loaded the truck
Truck ID
The ID of the truck
Hauler
The hauler the truck is associated with
Beacon ID
Beacon identification number associated with Beacon Hardware in/on truck
You may also remove any trucks from In-Yard by clicking the button.
Filter Hauler on In-Yard table
Entered
Navigate to [ Resources > Billing > Pay Terms ]
2
Click [ + New Terms ]
3
Fill out Fields
Add a one-character Code, a Description and the number of days for the term
4
5
Click [ ✓ Update ]
How to Create Billing Modes
1
Navigate to [ Resources > Billing > Pay Terms ]
2
Click [ + New Billing Mode ]
3
Fill out Fields
Add one-character Code and a Description
4
Click [ ✓ Update ]
Assigning Terms and Modes to Customers
1
Navigate to [ Resources > Customers ]
2
Edit Customer
Find the customer you wish to assign the Pay Term or Billing Mode to and click the [ Edit ] button.
To assign the Terms or Fields, update the following fields: [ Terms ] & [ Billing Mode ]
3
Click [ ✓ Update ]
Related Guides
References
Adding a particular billing mode to a customer profile allows you to select tickets for billing based on the customer’s assigned method.
The first step for setting up your Products & Pricing is to create the Products, Product Locations, and Pricing Templates. Please go to the Adding & Managing Products article if you have not done this yet.
Once your Products and Templates are set up, the next step is to set the Default Product Pricing.
Go to Resources > Products > Products & Pricing.
On the [Product Pricing] tab, enter in the filters for the Product Pricing you wish to set and click [Refresh].
This will load all of the Products that are available to add default pricing to for the set parameters.
Click the image to expand.
To add or edit a default price, find the specific Product, Location, and Price Template in the list and then click on the pencil icon to edit it.
This will bring up a text box inside of the table where you can enter in the Current Price and a Proposed Price. After the desired price has been entered, click the check mark to save or the prohibit symbol to delete.
Note: The Proposed Price is an optional tool to "stage" a price change. You can enter in a new price before enacting a price update that can be applied to the Current Price in bulk later on.
Enter any costs as a whole number or decimal value.
Once a Price is set, you will then see the [🖋️More] button where you can add in additional default pricing.
The Extra Pricing menu is displayed when the [🖋️More] icon is clicked.
Add in a Default Surcharge and set the Surcharge Type.
If you use Price Adjustments, you can set default Adjustments for the Template.
Click the [Save] button to save the extra defaults.
Repeat this process for each product and Template that will be used for Ticketing.
Remember: the default pricing set up on the Products screen is not completely inflexible. The final place where product pricing can be edited is at the Order level. Any pricing changes you make on the Order will override the default pricing you set up under Resources > Products.
To begin creating a new request, you will need to click the [+New Request] button in the upper right of the table.
When inputting your requests, you will only be able to select from orders and products available for your company.
See below for an example of a new request and a brief for these fields:
Description: A brief description of your Request.
Region: Where your Order and Products will be available.
Order: The Order from your merchant that provide your products
Product: The single product selected from the available Order.
Multiple products cannot be selected on a Request. If multiple products are needed, you will need to create an additional request for these products.
Delivery Info: This section is automatically populated by the selected Order.
Your merchant may have preset information in this field, but you may updated it as needed to include new or specific delivery information for each request.
Lat / Long: The Latitude and Longitude for the delivery. This is not required, but it can help to track your requests and help when reviewing the Delivery Query.
Reference: This number may be an internal number used to reference the Request, and is not required.
Duration, Request Date, To Date, and Time: These selections determine the time and date that your request is available.
Duration: All Day - Only applies for the selected Request Date.
Duration: Multi-Day - Applies to the selected Request Date through the To Date
Quantity: The volume of product available for the request. This can be set to either Units or Loads.
You will need to confirm the Unit of Measure with your merchant if you are unsure how this value needs to be input.
Ensure that all of the Required fields are entered Required fields will be noted as above until they are selected. If no selection is available in a required field, you will need to reach out to the contact at your merchant for assistance.
Once all of the required fields are input, you can click the [Save] button to submit your request. This will display in the main Request table as a Pending request, and will require your merchant to review and accept. When the request is accepted, you will see this status as Open.
Pending requests can be edited until they are accepted by your merchant. Any other changes after the request has been accepted, such as editing the Delivery Info or requested Quantity, will need to be managed by your merchant.
Beacon ID
Beacon identification number associated with Beacon Hardware in/on truck
Entered
Date and time the truck entered the yard
Loaded
Date and time the truck was loaded by loader
Loaded Min
How many minutes the truck was loaded while still in yard
Ticketed
Date and time the truck received a material ticket
Ticket Min
The amount of time between when a truck was loaded and when it received a material ticket
Ticket #
The ticket number associated with the material ticket the truck received
Order #
The order number associated with the material ticket the truck received
Order Description
The order description associated with the material ticket the truck received
Customer
The customer associated with the material ticket the truck received
Product
The product associated with the material ticket the truck received
Loader ID
The identification for the loader that loaded the truck
You can query by Region, Location, Date, Truck ID, and Beacon ID. You may also use the filter funnels in the table headers to make your search more specific.
Enter, Loaded, Load Min, and Ticket on History table
Above is an example that shows when the trucks were marked in yard, when they were loaded, the minimum amount of loads, and when the trucks were ticketed out.
Ticket # and order details in History table
You are also able to see the Ticket # and Order details associated with the tickets the trucks were ticketed out on.
If you are using the Loader app you will also be able to see the Loader ID of who loaded which truck.
Finally, you are also able to export to Excel by clicking the button at the top of the table.
Truck ID
The short hand identification for the truck
Hauler
History table in Load-Out module
The hauler the truck is associated with
This page will also show a table of all Customers with Open Invoices, along with an option to drill down into the details of an Invoice. The customer view for this screen has a [Payment] button available if they are enabled for Self-Pay.
Click the image to expand.
The table below the balance header displays the customer selected, or all customers if none are selected, and the following information:
Terms: The billing terms set for this customer.
Credit Limit: The credit limit applied for this customer.
Invoices: The amount of invoices available for the customer.
Balance Due: The total balance due from the invoices.
Overdue Balance: The total balance due after the Due Date has been surpassed.
Credit Standing: Provides a snapshot of the customers credit status
Credit Status: The status set on the customer under Resources>Customer.
Customer with no Credit Limit applied
The Credit Standing button will only show when a Credit Limit has been set for a Customer.
Customer with a $90,000 Credit Limit applied.
Clicking on the Credit Standing button will bring a new window detailing the current credit status of the Customer—including any tickets that have not yet been invoiced.
Statements
There are a few options when selecting statements, which will allow you to print all available statements (which will provide .PDFs), sending all statements to the contact emails, or allow for individual statements to be viewed.
Print All Statements will provide all statements as a .PDF. Depending on the selection, you can select only statements that do not have an associated email address. This allows you to print a physical copy of the invoice to be sent via traditional mail.
Send All Statements will send all statements to the associated email. There is no prompt for this action to select specific emails. You will need to ensure that the customer has a requested email or other contact listed for invoices in their Resources>Customer profile.
Statement will allow you to view an individual statement from the highlighted customer line. This information is the same information listed in the table when clicking the arrow to the left of the Customer.
By default, All Regions will display with no customer selected, providing an overview of your organizations outstanding invoices.
The Default Template will always be highlighted in green
Creating New Orders
While the latest versions of fast-weigh allow for orderless ticketing, Orders are still an essential part of the fast-weigh workflow.
How to Create Orders
1
Navigate to [ Orders > Orders ]
2
Click [ + New Order ]
3
Fill out required Fields
The minimum required fields to add a new order are Region, Description and Customer
4
Click [ Save ]
Adding a Single Product to an Order
1
Click [ + Add Single Product ]
While on the create/edit Order screen, select the [ + Add Single Product ] button on the bottom table. If the button is not there you may need to select [ Save ] for it to appear.
2
Adding Multiple Products at once to an Order
1
Click [ + Add Multiple Products ]
While on the create/edit Order screen, select the [ + Add Multiple Products ] button on the bottom table. If the button is not there you may need to select [ Save ] for it to appear.
2
Related Guides
References
How to Import Tickets
The Ticket Import screen allows you to build an interface with files from a ticketing system used previously, or with an outside company’s ticketing data that needs to be recorded.
Setting up your Import
You must be logged into an Admin account the access the Import Format page
1
Navigate to [ Settings > Import Format ]
2
Click on [ + New Format ]
3
Fill the Required Fields
The minimum required fields are the [Format Name ] and all fields with a [ 0 ]
Match your fields to the corresponding number of the column in your export with the column containing that information on your CSV
4
Click [ ✓ Update ]
The Import Format should now be created! Follow the Importing Ticket Data steps below to see how to use it.
Importing Ticket Data
1
Navigate to [ Tickets > Ticket Import ]
2
References
Bulk Updating Open Order Pricing
Once your current pricing templates have been updated with the new pricing, you can use the powerful Open Order Price Update tool to do a price update on all open orders across the board.
Due to the extensive changes applied by this tool and the potential for error if used without caution, this tool is reserved for Admin user accounts only. This tool is used to enact mass, system-wide updates. This cannot be undone! Use with care! We highly recommend using the "Price Update Review" report under the Orders category to review the pricing and orders that will be affected by a mass price update.
Before Updating
Navigate to "Reports" > "Reports - New Tab"
Review your new Pricing Template Defaults using the Price Update Review report under the Orders category of the Reporting page to make sure everything is correct.
Using the Open Order Price Update
After reviewing your existing prices with the Price Update Review report, you can navigate to the Resources > Products & Pricing menu.
You will use the top section to input parameters similar to the Ticket Query menu, with the results displaying in the lower section of the table. You can also leave these parameters set to ALL, to have all of the available products displayed.
Each line will display a single product, the Location where the product is available, and then the price template and its associated pricing. This template pricing is applied as the default price when adding products to new orders. .
After making the desired inputs and adjusting the rates as needed, click the Open Order Price Update button on the top-right of the Product Pricing table.
(Optional) Set the Region,Location, and Customer that will be affected by this price update.
Check the boxes for the information you want to update from the template pricing menu to the Order-Products on Open Orders.
Update Pricing: Updates the Material Rate on the Order-Products from the Pricing column.
Update Freight Charge Rate: Updates the Freight Charge Rate on Order-Products within the "More" menu.
Once your selections have been made and the [Update] button is clicked, your Open Orders will be updated to use the new pricing applied to the Pricing Template.
Charge & Cash Pay Types
Charge Types are considered Charge Show and Charge Hide. Cash Types are considered Cash, Check, and Card. Follow the steps outlined below to make an edit to these invoices.
As of our update, we have condensed editing invoices for Charge and Cash types, as the process is similar. Cash has an additional step and will be at the bottom of this page.
Navigate to Billing/AR > Billing or Billing if you do not use our AR module:
Navigate to Billing History:
Search for the invoice using the Invoice # search box:
Expand the batch by clicking the arrow to the left of the Region:
Click the [Actions] button on the invoice row to bring up the following:
Click [X Clear] to bring up the following:
Check the box and click OK and you're done!
Cash Type Additional Steps
If the price of the tickets from a cash type invoice will need to change after you make an edit you must:
Find Price column with [$] symbol. This can be found in the Ticket Query or New Billing screens.
Click the [$] icon to open the Pricing Edit window.
Uncheck the Lock Rate checkbox and save.
In the New Billing screen, ensure all edited tickets are checked.
Click [$Reprice Selected Tickets]
Click the Ok, and you are done! Now your tickets will have the correct pricing, and you may re-batch.
Payments
The Payments page will allow you to make new payments, and review any previous payment made toward your invoices as well as your statements.
Balance Dashboard
The Balance Dashboard will display you current balance with your merchant across a series of date ranges. The tiles across the top of the page provide a quick view of these ranges. By default, the table below these tiles will display all of your current invoices with a more detailed view for where this information is being referenced showing the following:
Invoice: The invoice number. This number is automatically generated by Fast-Weigh.
Region: The Region associated with the invoice/billing from the merchant.
This information is determined by the merchant at the time of their billing process and is not the exact location of the ticket(s) origin.
You can also use the Search field if you would like to review any specific information available on the Balance Dashboard without scrolling through the table by typing in the information related. This can be the Due Date, Invoice Number, or any value listed in the full table.
The last to options available on this page are the Statement and Payments buttons. Clicking the [📄Statement] button will provide a .PDF file of the Balance Dashboard, which includes any payments made.
Clicking the [$ Payments] button will redirect you to the next section.
Payments
The Payments menu allows you to make payments toward your invoices, either batched by your merchant during their billing process or any cash invoices that may not have been paid at the scale location. Similar to the Invoices page, the black arrow found on the left side of the page will allow you to expand the invoice to review the tickets included with each invoice and includes the following columns related to these unpaid invoices:
Invoice: The invoice number.
Invoice Date: The invoice date.
Amount: The total amount for the single invoice.
The selection boxes listed down the left side of the screen will allow you to select as many, or as few, invoices as desired to make payments toward. By selecting multiple invoices, the Selected Amount Totalwill automatically be adjusted based on the
Before creating the payment, you will need to select an available Payment Method. Depending on your merchant, you may have a few options available, which are covered further below.
After selecting your Payment Method, you can select a Payment Date, enter a Reference Number, or a Payment Note. The Reference and Note fields are not required, but may requested by your merchant. After these selections have been made or populated, you can click the [Create Payment] button.
When selecting the Card or ACH option, you will have the option of manually entering in a new Credit Card or ACH, or select from a saved payment method. If you would like to input and save this information for future payments, you can review this process in the next section.
Customer Payment Info
As mentioned above, your merchant may have a few selections available to accept payments - either saved Credit Cards or ACH information. If additional cards or bank information are needed to make payments, this information can be input into Fast-Weigh within the Customer Payment Info menu.
New Pricing Tools
This article will outline the use case and nuance of our new pricing tools.
As of Sept. 1st 2024 we updated our web portal to include new pricing and repricing options for tickets. This article will lay out where these tools can be found and how to utilize them.
Where the tools are located and how they work:
Ticket Query
There is now a "Pricing" column in the ticket query:
You will see the button in the pricing column until you batch your tickets. Once you have batched your tickets you will see the following in the pricing column:
Clicking the button in the ticket query will pull up Edit Ticket Pricing window:
Edit Ticket Pricing pop-up
First lets look at rates and the Lock Rate option:
Changing the rate in this pop-up will change the rates for the particular ticket when it comes time to batch your tickets. You may check the "Lock Rate" box to lock any or all of the rates on a particular ticket to ensure the rates do not get updated when batching via the Reprice Checkbox on the New Billing screen, more on this later.
Next lets look at Tax Code, Update Tickets, and the Update Order Product checkboxes:
You may use the Tax Code drop down to change the Tax Code on the particular ticket. If you need to change the tax code on all of the unbilled tickets on an order for a particular products you can check the Update Tickets checkbox to accomplish this. Checking the Update Tickets checkbox will update the tax code on all unbilled tickets that share the same order product.
The Update Order Product checkbox will take any changes you made to the ticket and apply them to the order product for any future tickets ran on the order. This will also allow you to make an edit to a single ticket and reprice in bulk while in the new billing screen via use of "Reprice Selected Tickets" or the Reprice Checkbox. See New Billing Reprice for more on this.
Edit Ticket Pricing for different Pay Types
Lock Rates are checked by default on tickets that are ran on an order with a Cash pay type set. Cash pay types include Cash, Check, and Credit Card.
Lock Rates are unchecked by default on tickets ran on an order with a Charge pay type. Charge pay types include Charge Show and Charge Hide.
Orders
There are two places within an order that include repricing tickets, the first is in the Update Products window:
Click to open the Update Products window:
This window allows you to easily update all products on an order. Take care to notice the Reprice Unbilled Tickets checkbox here, as if you leave this checked once you click "Save" all of the unbilled tickets for that order will reflect the new rates that were set. See if you would like more information on the fields in this window.
The second place to reprice tickets is in the order product edit screen:
You can now use the order product edit screen to reprice all unbilled tickets for a particular product on an order. You may also uncheck this box if you need your current unbilled tickets to maintain the previous pricing.
Billing - New Billing
There are three places in the New Billing tab of the Billing screen that allow you to change ticket pricing, and the first is another Pricing column similar to the Ticket Query:
When you first click the button you will see the following pop-up:
This pop-up is to alert you that the tickets that are checked as selected will be reset. In this case, if you were to only have one ticket selected and click "Ok" on this pop-up it will reset to all tickets being checked. Once you click "Ok" you will be met with the same Edit Ticket Pricing pop-up from the Ticket Query.
The options here function the same as the .
The next two places in the New Billing screen that you will find repricing tools are the button and the Reprice Checkbox():
Reprice Selected Tickets Button
The Reprice Selected Tickets button will reprice all tickets selected in the billing screen to match the pricing that is set on the order product. This action is completed immediately after clicking the button, so ensure you are certain you would like to change pricing before clicking the button.
If you typically run Pre-Billing Pricing Verification reports before batching tickets and your ticket pricing seems off on the report we recommend Repricing Selected Tickets and double checking the report. This typically sets the pricing to what is expected.
Reprice Checkbox
The Reprice Checkbox functionally does the same thing as the Reprice Selected Tickets button, however the action is completed at the time of creating a batch. If the Reprice Checkbox is checked, then when you click the button the tickets being batched will be repriced to match what is set on the order product.
Quotes
Quotes will allow you to manage a majority of the information for your quotes. You can set filter parameters, Status, Region, Location, and Project(will detail later in this article), at the top of the screen to see specific quotes of interest. There is also a Search function at the top of the table.
Click the image to expand.
You have the ability to create new quotes by utilizing the + New Quote button. Here you will fill out all the relative information for the quote. This screen is similar to creating a new order, and will also create a quote number that is automatically applied once the quote has been saved. The create a quote, the following will need to be entered on this screen:
Project (If you have any created)
Description
Status (Defaults to Pending but may be changed if needed)
Quote information (Region, Customer, Direction, etc.) similar to an Order
Assign Salesperson
Enter Delivery Info/Address if necessary
Set a Pricing Template
Set estimated Award and Start Date (optional)
Set Creation and Expiration Date
Save
Once you have saved you will see the quote number in the top left, and you will be able to add products by clicking either + Add Multiple Products or + Add Single Product depending on the quote. When adding products you will need to fill out the following:
Location
Yard
Product
You may also want to add more specific Active and Expiration Dates which you can do while adding the product(s), as well as a Delivery Date. Once you have entered all relevant information you can hit Update.
You have the ability to add any necessary Notes and Documents by clicking on the Notes and Documents tab. You can click into the field under Notes to add a note, and to add any documents you just have to click + New Document and upload the relevant document.
Lastly, you can add Contacts by clicking on the Distribution tab and adding the relevant contacts. There you can add the contact information and preferred delivery methods. Once you have added a contact click Save and you'll be able to click Send to send the contact the quote.
You can also click the Copy Quote button while having an existing quote highlighted and begin creating another quote this way.
Trucks
Detailed information on the Trucks tab in the Fast Weigh Web Portal
Here is where you are able to add trucks to the Haulers you have set up in your instance of Fast Weigh.
Trucks page and table
Above is an example of the Trucks page from one of our internal tenants. You are able to filter by Hauler and Status on this page, as well as use the Search or the Filter Funnels. These filtering options will be helpful for when you are trying to narrow down a specific truck.
You are able to Create, Edit, and Delete Trucks from this page, as well as upload and view any relevant documents for the trucks.
Adding a New Truck
Click "+ New Truck" to open the New Truck window:
The only required fields are Hauler, Truck ID, and Active, but you are able to fill out the rest to fit your companies needs. Below is an explanation for each field:
Hauler - Select the Hauler that the truck is going to belong to
Truck ID - The identifier for the Truck
RFID/BLE ID - If you are using a RFID/BLE scanner you can set the ID in this field
Once you have filled out the relevant information for the truck you are adding you can hit "Update" and the truck will populate in the table. Once the truck populates you can click the "View" button in the Documents column of the table to add relevant documents for the truck.
Adding Documents
When you click the "View" button in the Documents column a Documents window will pop up for you to add the relevant documents:
This window will show any documents you have added to the truck, and you can view or delete any existing document. Click "+ New Document" to add a document for a truck.
You just need to give a Title, Description, and add a File for the document to appear in the truck profile.
Lastly, you may also export the Trucks table to Excel for your company's needs.
How To Guides
Drivers
Page Overview
The Drivers page allows you to setup a Driver, which can then be assigned to a Hauler, and then added onto a Truck or multiple Trucks via the [ Trucks > Trucks ] page.
Drivers Table
Using the table above you can find and filter Drivers, Export table to .xls file, Delete drivers, and most importantly, Add and Edit drivers
Adding a Driver
To add a driver, please follow the walkthrough provided below [ Creating a New Driver ].
For a detailed description of all the fields on a Driver, please see the Table below.
Driver Fields
Field
Description
How To Guides
References
Haulers
Detailed information on the Haulers tab within the Trucks module.
Typically a Hauler is going to be a carrier, trucking company, or customer that owns that trucks in which you will be ticketing. You can also think of Haulers as a folder that one or multiple trucks belong to.
Here you are able to create haulers, as well as edit, delete, and assign existing haulers.
Haulers screen
You can create a new hauler by clicking the + New Hauler button in the top right of the hauler table. The following window will pop up:
New Hauler window
Enable Dispatching requires the Dispatching module add-on to be used. If you are interested in adding the Dispatching module please contact us at 865-219-2980 or [email protected].
The only required fields are the Hauler ID and Name. Below are brief descriptions of each of the fields:
Hauler ID - A shorthand ID for the Hauler
Name - Full name of the Hauler
Address - Fields for the Hauling Company's address.
Contact Information - Fields for the Hauling company's main contact
Vendor AP Num - Field to store Hauler's Vender AP number if one is to be used
Hauler Type - Field to differentiate Haulers as External, Internal, or Other
External - Outside company is hauling material
Internal - Your company is hauling the material
Insurance # - Field for Hauler's insurance policy number
(Insurance) Expiration - Set date for Hauler's insurance expiration
This applies to any truck within the Hauler
Workers Comp # -
(Workers Comp) Expiration - Set date for Workers Comp expiration
Certification # -
(Certification) Expiration - Set date for Certification expiration
Enable Dispatching - Allow trucks within the Hauler to be used for the Dispatching feature
All Regions - If checked, Hauler can be ticketed on in any region. If unchecked you are able to pick specific regions you would like the Hauler to be able to be ticketed on.
Active - If checked, Hauler is available to be ticketed on. If unchecked, Hauler will be unavailable and not populate in ticketing app.
Allow Overloaded Trucks - Future use in newest ticketing app
Use Tare on Inbound - Future use in newest ticketing app
Days Tare Valid - Future use in newest ticketing app
Once you have filled out the relevant fields you can click Update to add the Hauler.
Assigning Haulers to Customers
Haulers can be assigned to specific customers by clicking on the [✔️Assign] button under the Customer column of the Haulers menu.
In the new pop-up window, you can use the filters to search for customers, then click the checkbox on the left to assign them. This will prevent the Hauler from being able to have tickets created on orders for customers that are not selected from this menu.
New Payment
With the Fast-Weigh AR & Payments module, you can handle invoice payments directly through the Fast-Weigh Web Portal via Cash, Credit, or ACH. Streamline your material sales and payment collection process. Fast-Weigh AR & Payments offers low-cost processing rates with no hidden fees and allows you to deposit funds in the bank of your choice.
Payments
To pay an outstanding invoice, navigate to the New Payment page from Billing / AR > New Payment or from the Payment button on the Balance Dashboard page.
From the table on the Balance Dashboard screen, you can click the Payment button next to any Customer to apply a payment for that Customer. If selecting New Payment from the main menu at the top of the page, you will need to choose a Customer manually.
Invoices
The first screen you will see on the New Payments page will display any open invoices for the selected Customer that have not yet been paid.
On this table, the edit button allows you to modify the Amount to Pay if a Customer wishes to remit a partial payment or overpayment for an Invoice. The Remove button will remove a single Ticket from an Invoice. The Apply to Credit button allows for you to enter an amount from the customer credit balance to the selected invoice.
After the desired invoices are selected, you will see the payment menu refresh with the collected invoice totals. You will select the payment method and adjust the Payment Amount Total if necessary. In some cases, a customer may request an overpayment to be applied to their customer credit balance, which will reflect that amount associated in the field.
The Payment Date is the date the payment was made and will default to the current date.
The Reference Number will be available for Cash and Check payments and can be used to add in a reference number for your records.
The Payment Note is for any extra information that needs to be recorded with the payment.
When selecting the Payment Method for Card, you will have a new "Pay To" option added to select the payment processors. For assistance with the payment processors and terminals, please contact the Fast-Weigh support team.
Cash: The Customer is paying in Cash, no extra action is needed in the Web Portal.
Check: The Customer is paying via Check, no extra action is needed in the Web Portal.
Card: The Customer is paying via Credit Card. When you click Create Payment you will be prompted to enter their Credit Card information to process the payment.
Tickets
The tickets menu displays "loose" cash tickets that have yet to be paid. Selecting these tickets will allow you to group selected tickets to be paid for the desired customer, then create and distribute the invoice to the contacts available. This does not create a batch - you will not find the tickets under New Billing.
The information differs from the invoices in that it contains the ticket information such as products and orders. After determining the correct tickets, select the desired tickets bu clicking the checkboxes to the left of the ticket number. The right of the cash ticket table will automatically calculate the Invoice Amount Total, and the Invoice Date will default to the current date.
When selecting tickets to invoice and then distribute, a contact may not be available for the selected customer. First clicking the [Configure] will display the available contacts, then by clicking the [Edit Contacts] button another can be added.
Once the tickets for the Cash Invoice are selected and the Invoice Date is set, click Create Invoice to add the Cash Invoice to the Invoices tab. Once the Cash Invoice has been added, you can then submit a payment for the Customer.
Invoice / Payment Query
With the Fast-Weigh Invoice and Payments module, you can handle invoice payments directly through the Fast-Weigh Web Portal via Cash, Credit, or ACH. Streamline your material sales and payment collection process. Fast-Weigh AR & Payments offers low-cost processing rates with no hidden fees and allows you to deposit funds in the bank of your choice.
Invoices
From the Invoices tab, you can review all of your Open, Settled, or Credited Invoices. If you wish to close an Invoice without payment, you can Settle the Invoice. Once an Invoice has been settled, you will have the option to re-open it from this screen. You also have the ability to post adjustments to your invoices prior to accepting payments for discounts or any missed fees that may not have been applied. These adjustments are made in the menu.
The invoices page contains all invoices between the entered dates. This may result in multiple entries for the same customer. Clicking the arrow next to the customers name will expand this menu, allowing you to view the tickets contained in the invoices and their totals.
The two furthest right columns allow for a review of an invoice or adjustment an invoice. When clicking to view an invoice, you will be prompted to select a report type. If you have more than one report type, you will need to select the correct version.
To edit or adjust an invoice, select the button. This will open a new window, allowing you to select the Invoice Status and apply adjustments and/or notes for the settlement.
Invoice Statues
When selecting an invoice status, you will have the option of selecting from three different types: Open, Closed, and Settled.
Payments
The Payments menu allows you to review payments made on your invoices or issue refunds.
Similar to the Invoices screen, the information presented can result in multiple entries for the same customer, and clicking the arrow to the left of the customer will display the payment information. Instead of viewing the tickets associated with the invoices, you will see the total value of the invoices and the batch name.
Receipt and Refund
Similar to the Invoice screen, the furthest two columns on the right contain the options to review or refund the payments made. If a payment is made, the Receipt button will provide a .pdf including the payment details present on the main table.
A Refund can be issued on any payment, but you must select a method in which it is issued.
Original Payment Method: Returns the payment to the origin source for credit cards or ACH payments. Cash and check payments
Apply to Customer Credit: Refunds the payment total to the selected customers account as an available credit.
Refunds cannot be undone, so it is best to review all information prior to issuing one.
Using the Ticketing App
Creating Tickets in Fast-Weigh is streamlined by the Fast-Weigh Ticketing App. This is a brief overview of both the New and Legacy Ticketing Apps. For more details see the reference pages linked below
When the app is launched you will be greeted by the Ticketing Screen. This is effectively the "Home" Screen.
Navigating the App
Clicking the 3 lines in the top left corner of the app will show the Icon Labels:
How to Track Inventory
Enable Inventory Tracking on Products
Navigate to "Resources" > "Products" > "Products & Pricing"
Pay Types are set at the order level. Be sure to check the order to confirm what pay type the ticket was ran as. See Orders for more information on pay types.
Edit Ticket Pricing pop-up for ticket ran on Charge Show order
Ticket rates and lock rate checkboxes on Edit Ticket Pricing
Tax Code, Update Tickets and Update Order Product checkboxes on Edit Ticket Pricing
Cash Pay Type Edit Ticket Pricing Defaults
Charge Pay Type Edit Ticket Pricing Defaults
Update Products window in an order
Order product edit screen in an order
Pricing column in New Billing tab of Billing screen
Pricing button pop-up in New Billing
Edit Ticket Pricing in New Billing screen
Reprice Selected Tickets button and Reprice Checkbox in New Billing screen
Time: The time that your request will be active.
Update Surcharges: Updates the Surcharge Rate and type on the Order-Products within the "More" menu.
Update Adjustments: Updates the Adjustments on the Order-Products within the "More" menu.
Update Minimums: Updates the Minimums on the Order-Products within the "More" menu.
Click [✓Update] to run the Open Order Price Update tool for all Active and Inactive Orders marked as Open that match your set criteria.
If the Region, Location, and Customer selections are left as ALL, this price update will affect all Open Orders. Making a selection in these drop-down menus will apply the price update to the all Open Orders for that selection. Example: Specifying a Region will affect all Open Orders within that Region, but selecting a Customer will affect their orders only.
If you have updated pricing using the Open Order Price Update tool and have tickets that have not yet been billed at the previous rates, you will want to de-select the [Reprice ✅] when batching these tickets to avoid any unintended rate changes. This reprice option will adjust the rates on the tickets to match the current rates available on the order.
Batch: This invoice is associated with a larger billing batch from your merchant. These are generally created for accounts that are expected to be paid later.
Cash: This invoice is associated with a single invoice that is created at the expected time of payment at the scale location.
In some cases, your merchant may choose to batch these at a later time.
Batch #: The number or name of the larger billing batch that your merchant may have associated with your invoices.
Invoice Date: The date assigned to your invoices at the time of billing.
Due Date: Determined by your merchants billing terms.
Days Overdue: How many days the listed invoice is overdue based on the billing terms.
Invoice Balance: The remaining balance on this specific invoice. If any payments are made toward an individual invoice, any remaining balance will be reflected.
This may include several tickets if your merchant consolidates your tickets to a single invoice.
Previous Payments: Any payment made toward the invoice will be listed here.
Balance: The remaining balance on the invoice.
Amount to Pay: The amount being paid toward the single invoice.
This amount will be adjusted if a previous payment has been made toward the invoice.
The Credit Card and ACH values entered, such as the name and address are only referenced when communicating with the payment processor associated with your merchant. The credit card numbers and banking information are not stored within the Fast-Weigh system.
Hauler (If you would like to restrict ticketing to a single hauler)
Pricing Description
Tax Group and Tax Code
Unit Price (Will default to unit price of product but can be changed)
Freight Charge Rate
Hauler Pay Rate
Surcharge
Adjustments (If you have any)
Order Quantity and Quantity Type
Click the image to expand.
Driver - (Requires Dispatch Module) You can associate the truck with a driver you have set up if you have the Dispatch Module
Driver Email - (Requires Dispatch Module) You may add the driver's email here
Text on Ticket - Select if you would like to send a text to the driver when they are ticketed on
Mobile Number - (Requires Dispatch Module) You may add the driver's mobile number here, and if you would like to Text on Ticket you must enter the number
Active - Check to ensure this truck can be ticketed on
Test - This field is a UDF, see our UDFs article to learn more about setting these up
License - The truck's license plate number
License/Insurance Expiration - Fields to store the truck's License and Insurance expiration dates
Truck Type - Select the Truck Type, if you are using it - This must be set up prior to creating the truck in the Truck Types page in the Resources module
Max Weight - Pound/Tonnage capacity for the truck that can be set to prevent overloading
Target Weight - An ideal capacity for the truck that can be set
Volume - Volumetric capacity for the truck that can be set to prevent overloading
Tare - The weight of the truck while it is empty, you can set this up when first adding the truck and edit it at any time
Load-out Drops - (Requires Load-Out Module) Set the number of drops the truck is going to take and the percentage of the total amount of product per drop
If you are interested in adding the Dispatching or Load-Out module please contact us at 865-219-2980 or [email protected].
You do not have to assign a Hauler to a Customer to create tickets. If the Hauler does not have any Customers marked on the assignment list, they are available to be selected for ALL customers. Adding an assignment for a specific customer will restrict their availability to that specific customers orders only.
ACH: The Customer is paying via ACH. When you click Create Payment you will be prompted to enter their ACH information to process the payment.
You will also see the associated customer credit balance when selecting.
Click the image to expand.
Click the image to expand
Invoices can be distributed by email or text if available.
The minimum required fields to add a new product are Location, Yard, Product and Unit Price
3
Click [ ✓ Update ]
Select Products
Select any of the provided parameters to filter results and click the [Refresh] button
Select the products using the checkboxes next to them
The Use Template Pricing checkbox will apply template pricing to all selected products
3
Click [ Save ]
A Product must be added to an Order before it can be ticketed on. The Order can also be set to Open by checking the Open Order box if you would like to be able add products in the fast-weigh scale app
If you are importing Orderless Tickets, fields with a * are also required
"Header Row"is checked because the CSV in the above example does have a header row, this can be left unchecked if your columns do not have headers.
Overwrite Date: Will overwrite all dates on tickets being imported
Overwrite Hauler: Will overwrite all haulers on tickets being imported
Add New Trucks: Will add trucks on tickets being imported, if they are not in Fast-Weigh
The same is true for the 3 Dots in the top right corner:
Anytime you see a List Icon next to a Field it will open the associated list
For Example, Click the List Icon next to the Truck Field on the Ticketing Screen to view the Truck List:
Use the search box at the top of the List to filter down results:
The Truck List Search Box can match the following fields: Truck IDs, Hauler Names, License, AutoID, and Driver.
Creating Tickets
By default, there are only 5 required fields for creating a ticket: Truck, Customer, Order, Product, Weight.
Select the appropriate records by either typing the ID into the field or clicking the List Icon to search the associated list.
Optionally, a Ticket Note can be added by clicking the Ticket Note Button and typing into the text box:
Once you have selected the correct records, capture the weight for the ticket. This can be done a number of ways:
If you do not have a scale connected to Fast-Weigh, type the weight into the Weight Field
If you have a scale connected, click the weight field and then hit "Enter" on your keyboard or Click the Weight displayed in the bottom left:
The Ticketing App will show you a breakdown of Gross, Tare, and Net in Pounds and Tons (or Kilograms and Tonnes depending on settings) once you have captured a weight. Click Print if you want to create the ticket with this information.
Congratulations! You just created a ticket in the Fast-Weigh Ticketing App. The ticket will automatically sync to the web portal.
Video Guide
Landing Page
When the app is launched you will be greeted by the Dashboard. This is effectively the "Home" Screen.
Navigating the App
All of the Ticketing's App navigation can be found in the left hand sidebar. To open or close the sidebar, you can select this arrow button in the top-left.
You can navigate to the different pages of the app by selecting it in the sidebar. Above those navigation options is the list of Lanes that have been created for the Sync Config. Selecting a lane will bring you to the lane's Ticketing Screen.
Input Fields
Selections
Most input fields in the Ticketing App are made up of these Select fields.
Clicking them will bring up a window to search and filter for the data you are looking for. Then you can simply select the entry in the list to set the field to it.
Text Field
Text fields are usually found in User Defined Fields (UDFs) or in device configuration. These fields can be set by selecting the input box and typing the value. Some text fields use all characters, known as "alpha-numeric" and some others only use numbers, which are known as "numeric".
Switch
Switches normally toggle optional features or settings, and can be set to on or off.
Dropdown
Dropdowns are like selections except they only contain a few key options and usually toggle different modes or outputs.
Creating Tickets
When creating tickets in a lane, there are 6 required fields to set before you can create the ticket. Truck, Customer, Order, Product, and UoM, in this example that is in Lbs.
Accepting Weight
Before creating a ticket you must accept the weight by clicking [ Accept ]. This example lane is connecting to an IP scale, but if no scale is connected you will instead be prompted to input an amount manually.
Sale Amount
After accepting a weight, and if all the other fields are properly selected, a preview of the ticket amount will appear in the Sale Amount window.
Select the product in the Product Listing table, then click the [✎] button on the Location in the Product Locations table
Check the Track Inventory box
Setting Initial Inventory Quantity
Navigate to "Inventory" > "Inventory"
Select the Region and Location that your product is in and hit [Refresh]
Select the product and click the [+New] button
Set the Entry Type as "Set Inventory", enter a Date and Quantity
Click [✔Update]
Tracking Inventory
Fast-Weigh will automatically track any ticketed Inbound and Outbound orders for these products.
After setting the inventory, we ticketed an Outbound order for 6.50 units, bringing our Current Inventory to 993.50.
The lower table will show the Outgoing and Incoming amounts as well as the number of tickets.
Manual Adjustments - Receiving Inventory
Products that are supplied to your locations by other vendors, freight, or rail and are not ticketed via Fast-Weigh will need to be applied by a Manual Adjustment called Receiving. This can be done the same as setting the initial quantity. If you are you are adjusting the Current Inventory without an incoming amount, skip to the next section.
Search or Select the product from the main table, and then click the [+New] button in the lower table.
In the New Adjustment window, select the Receiving option in the Entry Type drop down, enter the quantity and adjust the date as necessary.
(Optional)Enter any necessary information helpful to identify the incoming amount, such as an external ticket or where the product was sourced.
The Receiving/Incoming column will reflect this adjustment, as well as the Current Inventory column.
Click the image to expand.
Manual Adjustments - Adjustments
Adjustments should be used when the quantity is changed or verified to be different than the tracked amount. Perhaps a truck was filled with the wrong product, dumped, and then filled with the correct product before leaving the Yard, but no Inbound ticket is created to "return" the material.
Search or select the product from the upper table.
Click the [+New] button in the lower table.
In the New Adjustment table, select Adjustment from the Entry Type drop down.
Enter the Quantity and adjust the date as needed, and include Notes or Reference information if necessary.
This adjustment is now reflected in the table in the Adjustments and Current Inventory columns.
If a Set Quantity, Adjustment, or Receiving action is made in error, selecting the [✖ Delete] button on the far right of the table will allow you to remove the record. You will be prompted to confirm as a caution.
After deleting the 6.50 Adjustment we applied, the Current Inventory and Adjustment columns revert to their previous values.
The previous action will be removed from the lower table.
Tracking Inventory
Fast-Weigh will automatically track any ticketed Inbound and Outbound orders for these products.
Ticket Query
Detailed information on the Ticket Query tab of the Tickets module.
Filters and Grouping
The Ticket Query is going to house all of the tickets that are synced from your Ticketing Application. Here you are able to filter your search utilizing the filter parameters at the top of the Ticket Query screen.
Ticket Query Screen
Each of the filter parameters are as described in the following:
Region - Specify region associated with the ticket - This must be set in order to filter by Order
Location - Specify location associated with the ticket
Yard - Specify yard associated with the ticket
Customer - Specify customer associated with ticket
Order - Specify the order that was ticketed on
Product - Specify the product that was ticket on
Hauler - Specify the hauler that was ticketed on
Truck - Specify the truck that was ticketed on
Ticket # - Enter a specific ticket number to find a single ticket
MP Tkt # - Enter a specific ticket number associated with a Multi-Product Ticket to return all the ticket Ex. Entering MP Tkt #: 1001 will return tickets 1001.1, 1001.2, 1001.3, if you utilize a multi-product ticket
Operator - Specify an operator to narrow down to one Ticketing App user
Batch # - Specify a batch number the ticket(s) have been assigned to
Invoice # - Specify an invoice number the ticket(s) have been assigned to
Date - Set the To and From to specify a date range of interest
PO Num - Specify a PO number the ticket(s) have been assigned
Type - Set the type of ticket you are trying to view
Current - This filter will include all your most current tickets: Original tickets(Version 1) and the Rebilled tickets(Version 3)
Original - This filter includes all Version 1 of your tickets, even if they have been Credit/Rebilled
Voids - Checking the Voids box will show any tickets that have been voided, whether they have been voided from the web portal or the ticketing app
Group by Columns - You can also drag any column and drop it on the "Drag a column header and drop it here to group by that column" to group by a specific column header
ETicket and Edit
The Ticket Query table provides all the information on the tickets that have been ran. You are able to print ETickets, Archived PDFs, as well as Exporting PDFs and an Excel spreadsheet of all tickets you have queried.
If you click the ETicket button on a given ticket it will download a PDF of the ETicket format of the specific ticket. This can be used for quick reference or any other company need.
To edit an individual ticket you can click the button to pull up the Edit Ticket window:
You may make any adjustments necessary to the ticket in this window, and you must leave a Revision Note before clicking Save. The Revision Note is to help keep record of edits to a ticket, and should be contain enough details to give reason for the edit.
Revision Notes and Archived PDFs
Scrolling to the right of the Ticket Query Table you will find other useful buttons, such as the Revision and Archived PDF buttons.
An Archived Ticket is an image of the ticket as it was originally created in the ticketing app, before any edits or revisions were made.
If you click the button the Ticket Notes pop-up window will come up:
This will show any notes related to the ticket, such as in the above example. The ticket was removed from an invoice, and then an Edit was made to the ticket and a Revision Note was left. This screen will show what Action was taken to create the note, the Revision Date, who the ticket was Revised By, and the related note.
If you click the button you will download a PDF of the ticket that was printed at the time of ticketing. This PDF will match the ticket that is printed at the scale house, and this can be useful for seeing differenced between an edited ticket and the original.
Image, Signatures, and Ticket Notes
Next to the Archived PDF on the Ticket Query Table you will see the buttons for Image, Signature, and Ticket Notes. These only populate if you are using a camera for the images, if you require driver signature, and if someone enters a ticket note either at the time of ticketing or in an edit.
If you click the button you will be able to view the image that was captured at the time of ticketing:
You are able to rotate the image as well as print the image if need be. If you rotate the image you must click Reset to get the image back to the original orientation.
If you click the button you will download a png of the driver signature that was captured at the time of ticketing.
If you click the button you will be able to view the note that was taken at the time of ticketing:
This note will contain the Ticket #, the Operator, and the note that was taken.
How To Guides
Related FAQs
Tickets
The Ticketsmenu contains both the Ticket Query and Delivery Query. The Ticket Query is the primary source to your your ticket information, outside of the Reporting tool. The Delivery Query may not be available based on your Tenant's preferences or may not be enabled.
Ticket Query
While the original Outgoing amount is still listed at 6.50, our Current Inventoryshows an even 2000 units from our Set Inventory and Receiving amounts.
Credit - This filter will show any tickets you have Credit/Rebilled and will show Version 2, which is the Credit ticket
Rebilled - This filter will show any tickets you have Credit/Rebilled and will show Version 3, which is the Rebilled ticket
All - This filter will show all tickets, including original tickets and Credit/Rebilled tickets
Revision and Archived PDF buttons on Ticket Query Table
Ticket Note pop-up window
Image, Signature, and Ticket Note buttons on Ticket Query Table
Image Viewer pop-up Window
Ticket Note pop-up window
The Ticket Query uses a series of drop down menus, referred to as "parameters," as selections to display your ticket information in the lower section of the page. When using the query, you can set as many or as little as you would like by clicking each menu, then selecting the desired item from the available list. Below is a brief of each parameter and the information they will provide.
Drop-Down Parameters and Free Text Fields
Region, Location, & Yard: These selections will allow you to narrow your results to a specific location or yard that your merchant operates. The volume and variety of orders your company has with your Tenant will influence what can be selected from these lists.
Example: You may have 10 Orders available from Location A, but none in Location B. By default, you will not have Location B listed in your Location drop down.
Customer: This selection should only display either ALL or your company. If you notice multiple customer selections in this menu, please reach your contact or known Admin with the Tenant.
Order: This selection will allow you to choose a single order to reference for your query. When a Region is selected, the magnifying glass icon will appear next to the Orders field, allowing you to select the desired order.
Product: Similar to the Order field, you can use this parameter to define a specific product from your orders. If an Order is also selected, you will only have products listed that are available from that order.
Hauler & Truck: These selections will narrow the results further by displaying the selected Hauler or Truck. While these can be set independently, the Truck field is influenced by the Hauler field. If a Hauler is selected, only trucks associated with that Hauler will be displayed in Truck field.
Ship To: This drop-down selection menu will display different delivery addresses that may be saved for your company or jobs that have been entered by your merchant.
Type: The last selection menu available will allow you to view different versions of your tickets. During the billing process, your merchant may need to make edits, adjustments, or credits against your tickets and invoices.
Current: This displays the most current version of your ticket.
Original: This displays the original version of your ticket.
The following fields are free text fields, and therefore, can result in no tickets being displayed if the information entered is incorrect or mistyped.
Ticket # & MP Ticket #:Individual ticket numbers can be input into these fields if there is a specific ticket you are attempting to review. Multiproduct (MP) tickets are differentiated using a decimal point and include a trailing number 1-9.
Example: A multiproduct ticket with three different products will appear as 100.1, 100.2, and 100.3.
Operator: This field references the location operator, or weighmaster, for your merchant. This information may or may not be available to you on your tickets, but can be queried if needed.
Batch # & Invoice #: If you are looking to review specific tickets associated with a single invoice, or a larger set of invoices, you can input either the full Batch Name/Numberor Invoice Number to display only these tickets.
PO #: This field can either refer to PO number associated with your order, or the PO number listed on the ticket. You may need to refer to your merchant for this value if one is not listed on your tickets or invoices.
The last two items in the parameter selection are found just below the Query button. These two icons will allow you to export your ticket data. The Export Excel button will provide an excel sheet of the information currently displayed of the the resulting query, and the Export PDF button will provide a .zip file containing the original PDF version of the ticket printed at the scale.
Ticket Query Results Table
After inputting your parameters above and clicking the [Query] button, your ticket results will display in the large white space in the lower half of the page. The information in this table reads from left to right, and can reviewed using the horizontal scroll (outlined) found at the bottom of the table. The most relevant information will be listed first and will remain visible while you scroll the information as needed (red divider). This includes:
Ticket Date & Time
Ticket Number
Version
This is related to the Type field above. When a ticket goes through a rebill process, the version of the ticket is displayed in this column. The original ticket will always be shown as Ver 1, though the current ticket may display a different version number.
Order Number
Truck ID
Clickable Icons in the Query
There are a few icons that can be clicked within the resulted query. Here is a brief for these icons:
ETicket: Provides the most up-to-date version of your ticket. If any edits are made to the ticket, these will be reflected on the ETicket only.
Archived: This is the original ticket that is created at the time of ticketing. This is the digital version of the ticket that is physically printed at the scale location.
Your merchant may not print or provide physical tickets. These two options will allow you to print your own tickets as needed.
Revisions: When edits to tickets are made, we require a Revision Note to be included. You can review these notes along with a timestamp of when these edits are made.
Image: If your merchant uses image capture, you can view the image captured at the time of the ticket creation. This image is dependent on your merchants preferences, and may contain several angles of the truck on the scale, or a single image showing the Truck/Hauler logo with the driver visible.
Note: While creating a ticket, we allow the weighmaster/location operator the include a note with the ticket. This note may include delivery instructions, a description of the vehicle, or contact information.
Delivery Query
The Delivery Query can be used to track your requested and expected products, and you can use the parameter and filter options to narrow your results just as you can in the Ticket Query. The Delivery Query also provides both an ETicket and the Archived version of your ticket as well, and includes an image that may have been captured at the ticket of ticketing, or at the time of delivery, depending on your merchants preference or requirements for delivery orders.
Unique to the Delivery Query are the Map Results and Map icons. These icons will either allow you to view all of the resulting tickets, or individually when clicking the [🌎] icon, overlaid on a third-party provided interactive map.
When clicking the [Map Results] icon to display all of your tracked deliveries, you may initially only have a few tickets visible. Zooming in will display your tickets in closer view based on their proximity. In the image above, we can only see one ticket. When zooming in, as the image below shows, we can see two tickets delivered a the same location.
The Delivery Query will also provide additional information about your delivery, such as the time in transit, who received the order, or who signed for the delivery.
It is heavily recommended that you do not run an "open" query, meaning, each parameter selection set to ALL with no date range applied. You will likely receive a time out error as the amount of data that is being referenced has no start or end date, nor specific parameters to silo the search, and need to refresh the page.
By default, the date selections are set to the current date, so you may need to expand your date range to include the information being referenced by typing the date or selecting it from the Calendar icon.
Please note that Fast-Weigh uses the US Standard language and will not automatically detect and correct incorrect or international date formats. If you encounter any issues when using the Fast-Weigh portal, you may be using a different language pack in your browser. You can adjust this in most browsers Settings -> Languagemenus.
If the ticket's Pay Type is Charge Hide this window will appear blank
Credit: This displays a credited version of your ticket.
Rebill: This displays the rebilled version of your ticket.
All: This displays all versions of your ticket
A further view on this Type selection can be reviewed below.
Requests
Requests are the backbone of the Dispatching module. Requests are order product specific which means it is specific to a Location, Order, Product and date range.
Requests Dashboard
The Request Dashboard has 3 views that can be toggled by clicking the file tabs: Requests, Trucks, and Whiteboard.
At the top of any view of the Request Dashboard, you will find parameter filters and creation options
Region: Filter the listed requests down by the region
Status: Filter the listed requests down by Status
Active: Displays all Requests that have not been closed, including both active Requests and those on hold.
Open: Indicates that your trucks should be actively running loads for that Request. On the whiteboard, open Requests are green.
Hold: When a Request is placed on hold, trucks are not actively running loads for the Request but will resume at some point. On the whiteboard, Requests on hold are blue.
Date: You can enter a Custom Date range or use the Quick Date Range selectors.
New Request: Creates a new request
Copy Request: If a request is selected (highlighted green), Copy Request duplicates the request as a new request. You can then modify the copied request.
Send Notification on Remove: Automatically notifies the driver that they have been removed from a request when they are removed.
Requests View
On the Request view, you will see a list of all requests relevant to the selected filters:
Request Level Actions
Alert: Prompts the user to enter a message to be sent to all assigned trucks
Edit: Navigates user to the Edit Request page for the selected request
Delete: Deletes the request. Only allowed if no tickets have been run on the request
Clicking the small triangle on the far left will expand the request, and show the haulers assigned to the request
Hauler Level Actions
Trucks: Opens the Add Trucks Menu
Resend: Resends the Request information to the assigned trucks
Print: Downloads the Dispatch Request PDF
Email: Automatically Emails the Dispatch Request PDF to the Hauler's Contact Email
Clicking the small triangle by the hauler on the far left will expand the request further, and show the trucks from that hauler assigned to the request
Truck Level Actions
Resend: Resends the Request Information to a specific truck
Alert: Prompts the user to enter a message to be sent to all assigned trucks
Edit: Opens the Edit Request Info for Truck
Delete: Removes truck from the Request
Trucks View
Add: Opens the Add Truck to Request Menu
Clicking the small triangle by the truck on the far left will expand the truck to show all assigned requests
Assigned Requests Level Actions
Resend: Resends the Request Information to a specific truck
Alert: Prompts the user to enter a message to be sent to all assigned trucks
Edit: Opens the Edit Request Info for Truck
Delete: Removes truck from the Request
Whiteboard View
Creating/Editing a Request
Region: Sets the Region for this request
Order: Sets the Order for this request
Customer: Automatically populates based on the selected order
Product: Sets the Product from the selected Order for this request
Save: Saves the Request and activates the Haulers and Requested Truck Types panels
New: Creates a new empty request
Close: Returns the user to the requests screen
Request Description: Describes the request so that operators/drivers are able to easily identify which request it is
Delivery Info: Generic information field that can be used to describe additional information about the delivery location or process
Address: The Delivery Address for this request
Reference #: Generic field for internal tracking of the request
Latitude/Longitude: Exact coordinates of the delivery location
Map: Opens a map that a pin can be dropped on to determine the Latitude/Longitude of a delivery location. Useful for deliveries that do not have exact street addresses
Duration: How long the Request is active for
All Day: 1 day
Multi-Day: continuous range of days
Request Date: Start of the Request
To Date: End of the Request (only available for Multi-Day Requests)
Time: The time of day the request starts
Quantity: Number of units/loads needed for this request
Quantity Type: Determines whether the Quantity entered will be tracked by Units or Loads
Status: Status of this request
Open: Indicates that your trucks should be actively running loads for that Request. On the whiteboard, open Requests are green.
Hold: When a Request is placed on hold, trucks are not actively running loads for the Request but will resume at some point. On the whiteboard, Requests on hold are blue.
Pending: When a Request is created by a Customer User Log In the status is set to Pending, an internal user must update the status of the Request once it is deemed legitimate
Close on Complete: If enabled, the request will update its status to closed when the Quantity is fulfilled
Has Notes: If the order for this request has notes the View/Edit button will be enabled and will redirect the user to the Notes on the order
Add Trucks
Duration:
From Date: Start of the Request
To Date: End of the Request (only available for Multi-Day Requests)
Time:
Quantity: Number of units/loads needed for this request
Quantity Type: Determines whether the Quantity entered will be tracked by Units or Loads (Drop Down Menu next to Quantity)
Priority Level:
Remove on Complete: If enabled, the truck will be removed from the request when the assigned Quantity is fulfilled
Truck Message: Custom message that will be sent to the driver
Alerts
Please Enter Your Message:
Edit Request Info For Truck
Duration: How long the Request is active for
All Day: 1 day
Multi-Day: continuous range of days
Request Date: Start of the Request (From Date)
To Date: End of the Request (only available for Multi-Day Requests)
Time: The time of day the request starts
Quantity: Number of units/loads needed for this request
Quantity Type: Determines whether the Quantity entered will be tracked by Units or Loads
Priority:
Remove on Complete: If enabled, the truck will be removed from the request when the assigned Quantity is fulfilled
Truck Message: Custom message that will be sent to the driver
Add Truck to Request
Requests:
Duration: How long the Request is active for
All Day: 1 day
Multi-Day: continuous range of days
From Date: Start of the Request
To Date: End of the Request (only available for Multi-Day Requests)
Time: The time of day the request starts
Quantity: Number of units/loads needed for this request
Quantity Type: Determines whether the Quantity entered will be tracked by Units or Loads (Drop Down Menu next to Quantity)
Priority Level:
Remove on Complete: If enabled, the truck will be removed from the request when the assigned Quantity is fulfilled
Truck Message: Custom message that will be sent to the driver
Billing
Fast-Weigh features a flexible billing system that integrates with third-party accounting systems. This section allows you to organize groups of tickets into batches for invoicing a customer. Once a batch is defined, the system will automatically generate invoice numbers and group tickets into invoices.
You can change your settings for how invoices are created in the Portal Settings.
New Billing
Under the New Billing tab, users can query tickets by a number of different search parameters and produce filtered groups of tickets to assign to a custom batch. Typically, this would be done on a daily or weekly basis to correspond with your organization’s customer billing cycle.
Navigate to the Billing menu, and then the New Billing tab.
Query Tickets for New Billing
Set the parameters at the top to view the tickets you wish to group into a Batch to be billed.
The grid below will populate with tickets that can be batched.
You can also group tickets together in the grid based on one or more columns by dragging the column header to the bar above it.
Use the checkboxes on the left of the grid to select which tickets you wish to add to a Batch.
Verify the data and make any changes as needed. The Edit,Pricing, and PO Adjustment buttons allow you to update Pricing or Tax Codes, edit the ticket directly, or adjust the PO Number associated with the ticket.
Batching Tickets
Once the Tickets in the New Billing query have been verified, assign them a Batch Number via the field at the top right of the table.
This field is limited to 10 characters. Generally, this Batch Number will be in a date or Region + date format.
Billing History
Once a Batch has been created, the Tickets will be moved from the New Billing page to their appropriate Batch in the Billing History section.
On the Billing History screen, use the parameters on the top to view individual Batches or view Batches from a specific date range, then Export them or send them directly to a customer.
Export: This method allows you to post invoices directly to your accounting system, based on your settings.
Clear: Use this to clear a Batch so that you can make changes and re-Batch under the New Billing tab.
Print: Allows you to print from a PDF copy of the selected Invoice Batch.
You may also export,clear, print, or email individual Invoices within a Batch by clicking the arrow on the left of the table next to the Region column.
Contained in this menu is the [Action] button, which will allow you to clear the invoice or to issue a Credit/Rebill, which credits invoice, creates credit memo, and creates new tickets for rebilling. This process can be reviewed in the next section.
Credit/Rebill
A Credit/Rebill action credits the invoice, creates credit memo, and creates new tickets for rebilling. This process should be used when attempting to edit tickets that have been created from orders with a Cash Pay Type since these types of transactions are understood by Fast-Weigh as immediate transactions.
To issue a Credit/Rebill:
Navigate to the "Billing History" tab
New drop down menu labeled "Batch Type"
View invoices, credits, or both
When an invoice is credited, it will attach "-CR" to the end of the batch number.
This can be customized
Back date the invoice date if needed
When you hit print on the invoice, you can see that the total is now negative
How Does Credit/Rebill Affect the Ticket
If you query your ticket number, it will only show the current version of the ticket. (Which can be rebilled again).
You can change your view by selecting it in the new "Type" dropdown menu.
After a ticket has been credited and rebilled, you will notice the "Type" column updated to reflect the action taken on the ticket. This is also reflected in the "Material Amount" column, where the material amount is changed between a negative and positive value.
In order to credit a ticket without rebilling it, all you have to do is void the current version of the ticket be editing the ticket in the ticket query.
Click the [Edit] button.
Click the "Void" checkbox and fill in each Note field.
Click [Save]
Pending: When a Request is created by a Customer User Log In the status is set to Pending, an internal user must update the status of the Request once it is deemed legitimate
Closed: The Request is complete. No more loads will be run. On the whiteboard, closed Requests are grey.
All: Show all Statuses
Closed: The Request is complete. No more loads will be run. On the whiteboard, closed Requests are grey.
Custom Date Range
Quick Date Range Selector
For example:
A batch created for a region named “West” on 10/15/2016 could be batched as W-101516.
Assign a Company Code to the Batch, if needed.
Set the Invoice and GL Date for the Batch, if needed.
The GL (General Ledger) Date is only needed if your accounting system supports secondary Invoicing dates.
Invoice Numbers are assigned automatically and sequentially to each Order or Customer (based on your billing settings) within the Batch.
Click Assign to create the Invoice Batch.
Email: You can email invoices directly to customers.
Before using this feature, you will need to go to Resources > Customers and to add their Invoice Email to their Customer profile if one is not already present.
Expand the invoice to see the "Actions" button
Hit "Credit/Rebill," select "I understand and wish to proceed," and hit "OK"
Note: Be aware that changing or editing tickets or their prices will clear all ticket selections.
Note: Invoices will always be broken out and grouped together based on the Invoice Break setting in your .
Fast-Weigh supports direct transmission of invoices to both Viewpoint, Spectrum Accounts Receivable/Job Requisition and QuickBooks Online without needing to import any files or third-party tools.
Click the image to expand
Click the image to expand.
Click the image to expand.
Click the image to expand.
After selecting "All" you will see each version of the tickets.
Here you are able to manage your orders. You can filter by Stats, Region, and Location at the top of the screen. You can also use the Search bar or utilize the filter funnels to narrow down to specific orders.
You can create orders by clicking + New Order. In the new order screen you will be able to set up an order with associated product. The order number will fill once the order has been saved, and you can fill the information outlined below.
Order Screen filters
New Orders:
Description: Give order a name, title, or any other description
Status: Set order to active, inactive, or closed
Active: Order currently being ticketed
Adding Products to New Orders
Add Single Product
If you only need to add one product to an order then click + Add Single Product. This opens a window for you to fill in the information necessary to add the product to the order. You can add an unlimited amount of products to an order to account for any varied setups. After clicking + Add Single Product fill out the following:
Location: Location where the Order Product will be available
Yard: Yard where the Order Product will be available
Product: Product for the given Yard (NOTE: Only products that share a Pricing Template with the Order
Adding Multiple Products
If you would like to quickly be able to add multiple products to an order you just have to click + Add Multiple Products. From here you can filter by Location, Yard, and Product to narrow down which products you would like to add.
Once you click Refresh after selecting your filter parameters you will see your products populate in the table below. From here you can select as many products as you need to be added to the order.
Here you are able to override the product pricing if necessary, as well as set Freight/Hauler Rates, Order Quantity, and provide the same dates as if you were creating a single Order Product.
Updating Products
If you would like to create quick edits to the product(s) on your order, you can click the Update Products button in the top right of the Products table.
Any changes you make here will overwrite the current information for each product on the order. Any field you leave blank will not update on the product. Each field:
Location: Location of product you wish to update
Product: Product(s) which you would like to update, if set to All this will update all the products on the order
Unit Price: Price of material
Deleting Products
You are able to delete individual products from orders by clicking the "X" button in the Product Table. Find the row that includes the product you wish to delete and simply click the "X".
You are also able to delete all products from an order by clicking the "X Delete All Products" button in the top of the Product Table. You will be prompted if you are sure you want to delete all products, and if you are then you can click OK.
Notes & Documents
Here you are able to add any relevant notes or documents for an order.
Attached files only viewable from Order Setup screen
Notes field can be mapped to a custom report - if requested
Editing Existing Orders
In the Orders screen you have the option to Edit an already existing order.
Clicking Edit will take you to the same screen as you were creating the order, and allows you to make changes to the order.
Copy Order Button
If you would like to quickly create an order that is similar to an already existing order, you can highlight the desired order and click Copy Order to begin creating an order based off the order you copied. You can make any changes necessary to the new order.
How To Guides
Inactive: Order cannot be ticketed on, but can be reactivated
Closed: Order cannot be ticketed on, and generally closed permanently
Review Required: This is optional, and this makes it where any tickets made for the order cannot be billed or added to hauler pay statements until the order is reviewed and the Review Required box is unchecked
Region: Order must be linked to a region of operations
Direction: Used for scale house to determine if weighing inbound(dumping) or outbound(material sales)
Ticket Source: Set which Devices have access to the order for a Location
All: Order can be ticketed from any device
Portal Only: Tickets can only be created using the manual Ticket Entry
Scale House: Order can only be ticketed from Desktop Ticketing App
Mobile: Order can only be ticketed from Fast-Weigh Mobile App
Use Haul Zones: This is optional, and if enabled will turn on Haul Zones for particular order
Customer: Select customer for the order
Pay Type: Select pay type for the order
Charge Show $/Charge Hide $: Charge to account with dollar amount shown or hidden on ticket
Cash, Credit Card, or Check: All display the dollar amount on ticket
Salesperson: This is optional, and allows you to set a salesperson for the order
Delivery Info/Address: Optional, and will be printed on every ticket
Open Order: Enabling establishes the order should always use Price Template's default pricing
Allows pricing on order to be updated via Open Order Price Update tool
Unlocks Desktop App "Add Products from Template" for adding products on the fly
Pricing Template: Template for Default Pricing used for Products added to order
Defaults based on Customer, but can be changed. What is set will control Default Pricing for Order Products
Default PO Number: Set the PO number to be used for ticketing on the order
Ticket PO Rule: Determines behavior of how PO numbers are applied to tickets
Default Only: Applies order PO to the ticket PO
Optional: Creates PO field in ticketing app and Ticket Entry that may or may not be filled out
Required: Creates PO field in ticketing app and Ticket Entry that must be filled out
Job Requisition: Enable to be able to select a Job and Phase if you have any
Job: If Job Requisition is enabled, you can use the magnifying glass to search and apply the appropriate job to the order
Phases: If Job Requisition is enabled and you have a Job selected, you can also select the appropriate phase for the order
Certified: Check this if this is going to be a Certified Order
This can be used to show or hide custom wording on custom tickets and reports
Load Settings:
Amount Minimum: Minimum dollar amount to charge on ticket at scale house
Load QTY Default: Allows for default load values or truck capacity values to be added to order - Typically used when selling by cubic yard
Use Truck Capacity: Use Truck Volume Capacity defined in Truck setup table
Use POD: Check to turn on Proof of Delivery for this order. Allows you to use Proof of Delivery mode on Fast-Weigh Mobile App to confirm receipt of delivery by scanning ticket. (Requires purchase of Proof of Delivery Module)
Evaluate Order Quantity: NOTE - This can currently be enabled on the desktop ticketing app, and does nothing from the web portal currently.
Save
will appear.)
Hauler: Set a Hauler to restrict ticketing on this product to a specific hauler. If you leave this blank any hauler can be ticketed on.
Pricing Description: Describe the product
This will be necessary if you are adding a product more than once from the same Yard so that correct variation of product can be selected when ticketing
Tax Group: If tax code at time of ticketing is necessary you can set a Tax Code Group for the product
Tax Code: Select appropriate material tax code unless you are using Tax Code Group.
Unit Price: Material pricing
Fast-Weigh will load default pricing for customer associated with the order by default
Freight Charge Rate: Amount the customer is charged when invoiced, and can be set per unit or per load
Hauler Pay Rate: Amount owed to an external Hauler, and can be set per unit or per load
Surcharge: Surcharge, fee, or miscellaneous charge amount, and can be set per unit or per load
Adjustments: If you have pricing adjustments you can select them here, and you may select up to three per product.
Status: Set status of the product on the order
Active: Product available for ticketing
Inactive: Product unavailable for ticketing, but may be reactivated
Closed: Product unavailable for ticketing, and may no longer be available in the future
Active Date: Product will be inactive and hidden from ticketing until this date
Link to the product on an order, not the order itself
Expiration Date: After this date the product will become inactive and unavailable for ticketing
Delivery Date: You can set an expected delivery date for the product on the order
Order Quantity: Define set number of tons or loads for the product
Utilizing the Evaluate Order Quantity in the ticketing app will work together with this setting to warn or prevent an operator from ticketing once an order has reached the Order Quantity
Quantity Type: Set the Order Quantity to Per Unit or Per Load.
Default Phase: For use with third-party accounting systems that use accounting phases
Cost Type: For use with third-party accounting systems that use cost types
Click Update when done
Freight Charge Rate: Cost to customer for shipping material
Hauler Pay Rate: Amount owed to external hauler
Surcharge: Surcharge, fee, or miscellaneous charges
Tax Code: Material tax code
Active Date: Product inactive and hidden from ticketing until this date
Linked to product on an order, not the order itself
Expiration Date: After this date product will become inactive and unable to be ticketed on
Delivery Date: An estimated date of delivery
Save
To add products to an order ensure that you have created a product in Resources>Products.
Note: The selected products will use the default Price Template set for the order. If you uncheck Use Template Pricing you will be able to override the price of the products using the fields below.
NOTE: If you have already created tickets for a product on an order then you will be unable to delete that particular product from the order. See below image for an example where I was able to delete 2 products but the third was unable to be deleted due to tickets being created with that order product.